Since Ghostbusters first showed up on film over 35 years ago, people have been attempting to recreate the ECTO-1 Ectomobile. Some have done a better job than others. Some of the parts are hard to find, and some people recreate them on their own.
I find that people can be pretty critical if you get any of the details wrong. I get that there’s simply the fun in making your own version of the Ectomobile. Personally I go in to things with a ride or die attitude. If you’re going to do it, then go all in all the way and try to make it look like a legitimate Ghostbusters vehicle.
That said, some of the coolest Ectomobiles have been built out of modern vehicles. A good example is the Dodge Magnum:
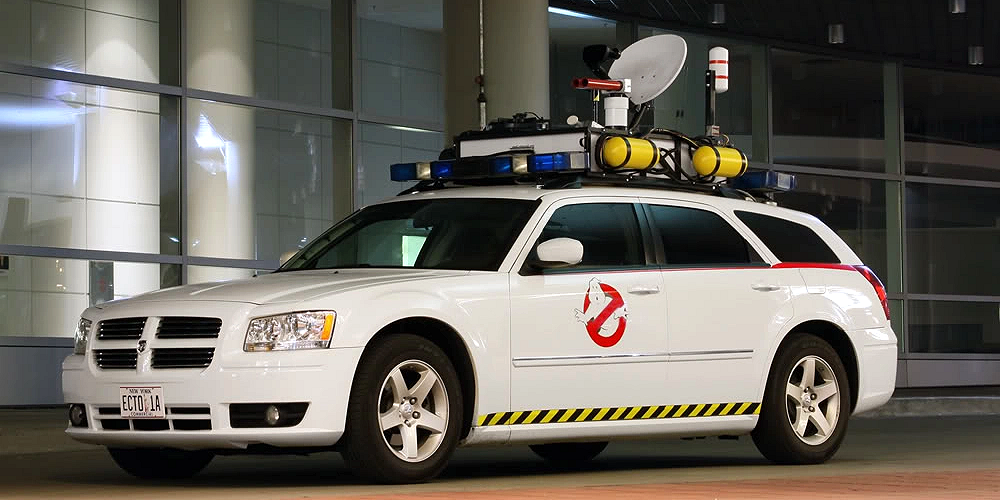
This car appears to be a mix of ECTO-1 from Ghostbusters and ECTO-1A from Ghostbusters II. More specifically, ECTO-1A had a satellite dish and black and yellow stripes on the side. ECTO-1 did not. In this case, the person that built the vehicle decided to build the vehicle they felt the Ghostbusters would drive today. Not only is it cool, but it’s clearly not an attempt to recreate the original Ghostbusters car, so there’s no reason for die hard fans to be critical of the details.
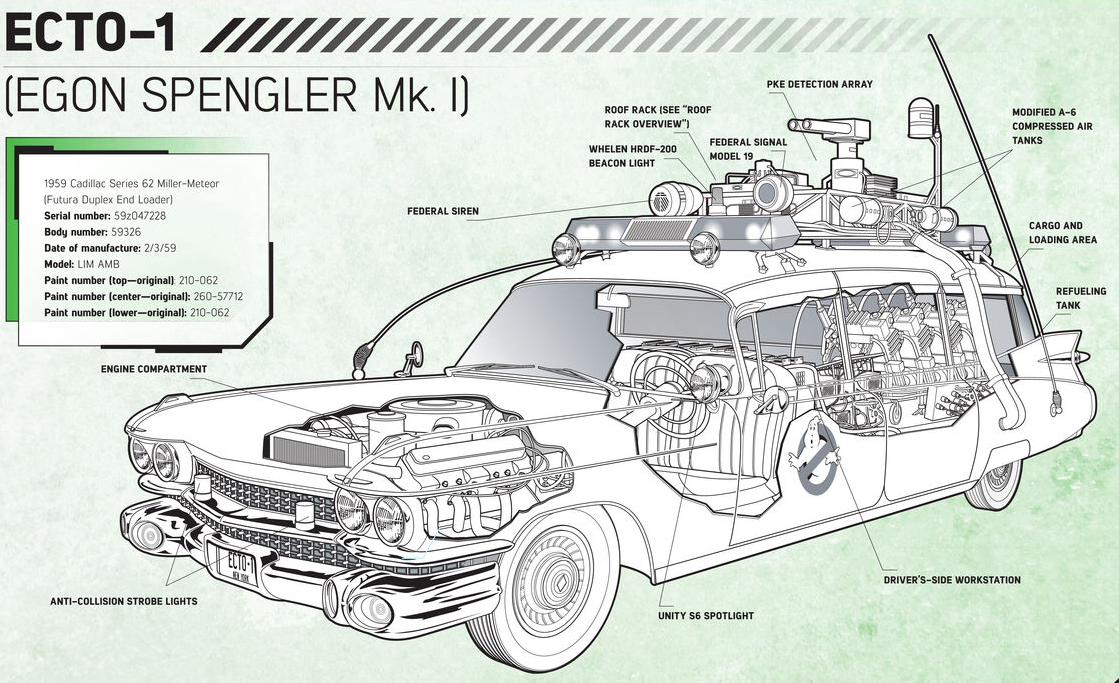
1959 CADILLAC MILLER-METEOR FUTURA DUPLEX:
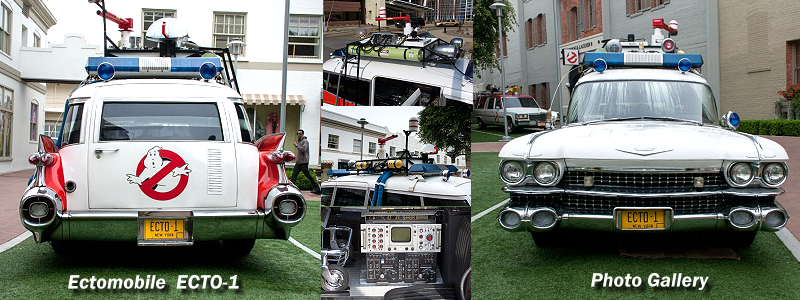
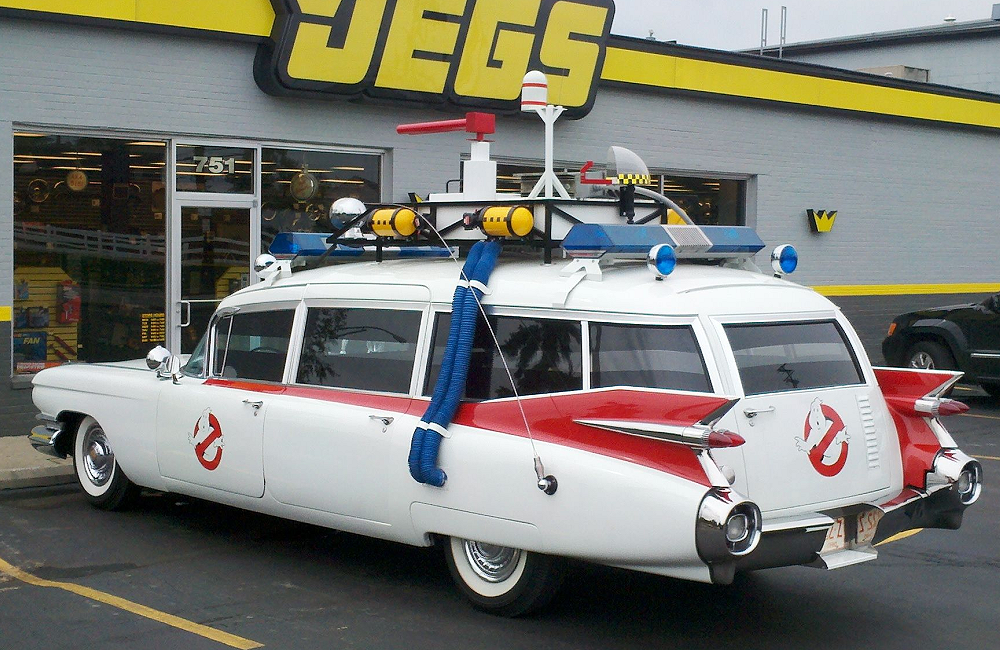
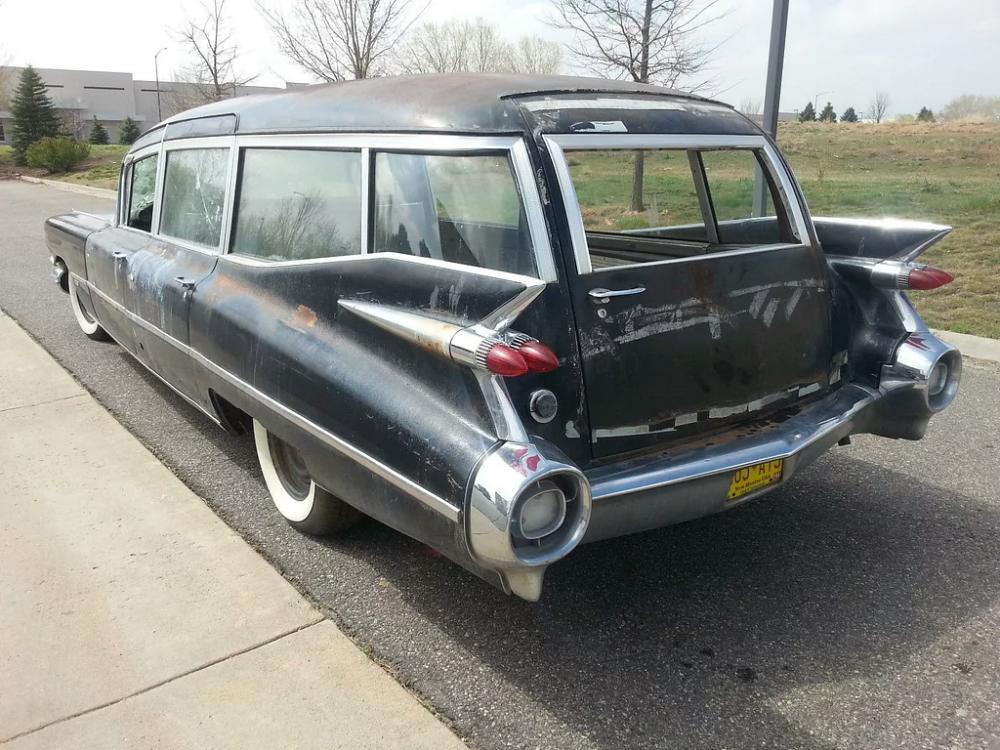
The cars used in the Ghostbusters (1984) and Ghostbusters II (1989) is a 1959 Cadillac Miller-Meteor Futura Duplex (hearse / ambulance combination). The Futura models have wrap around windows in the rear.


(The real Ghostbusters 1959 Cadillac Miller Meteor Futura Ectomobile)
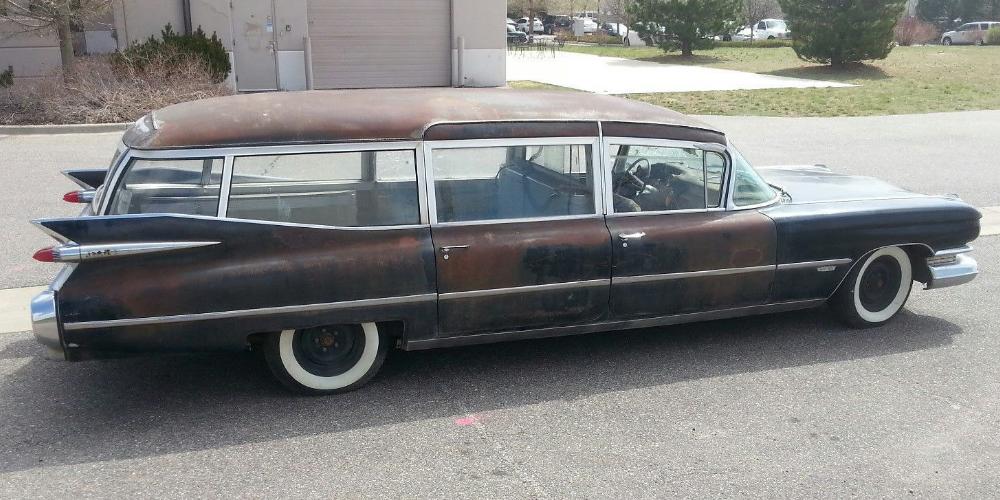
There is said to only have been 400 1959 Cadillac Miller-Meteor’s built. There were several companies that built ambulances and hearses on Cadillac’s Professional Chassis. So just because it’s a 1959 Cadillac doesn’t mean it’s the right car. Look at how the window trim is straight around the side and rear corner of the body. Now look at the photos below.
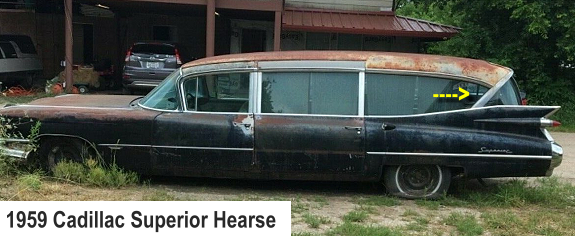
Notice how the window frame at the back corner on this 1959 Cadillac Superior ambulance / hearse angles (yellow arrow).

Both the 1959 Cadillac S&S (Hess & Eisenhardt) and 1959 Cadillac Barnett coaches do not have rear corner windows.

The 1959 Cadillac Eureka ambulance / hearse had a rear side window that sloped down, and a rear corner window that sloped up.

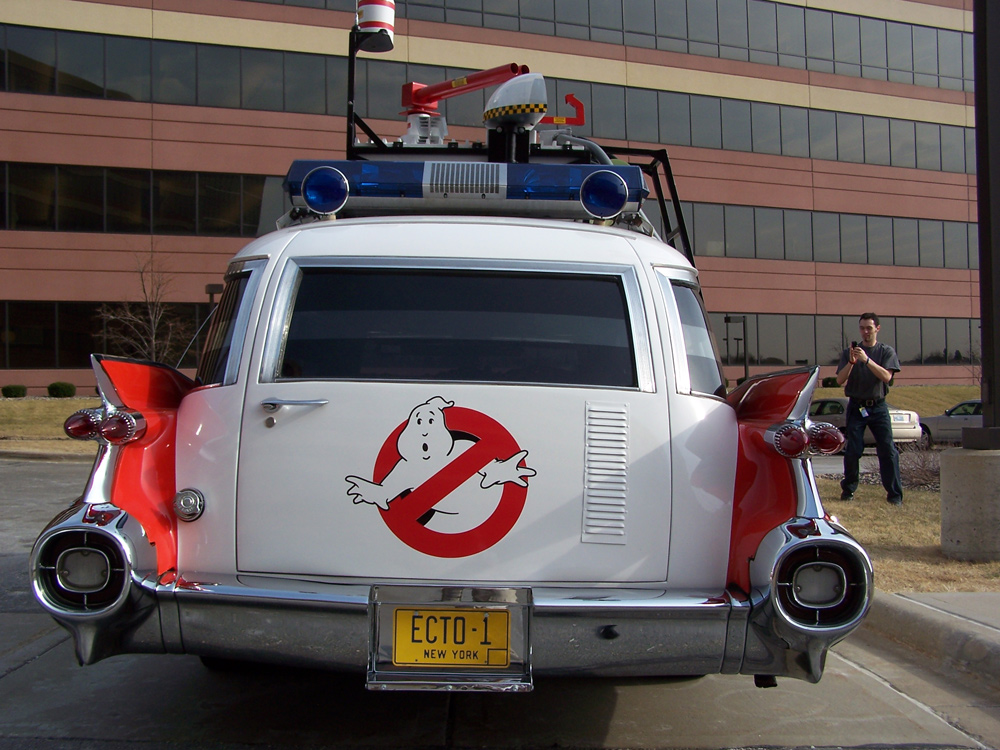
Here’s another fine detail. Notice how the red on the side of ECTO-1 is encased in chrome trim? The louvers on the back door are not original. We’ll discuss that later.
STEPHEN DANE – DESIGNED AND OVERSAW DEVELOPMENT OF ECTO-1
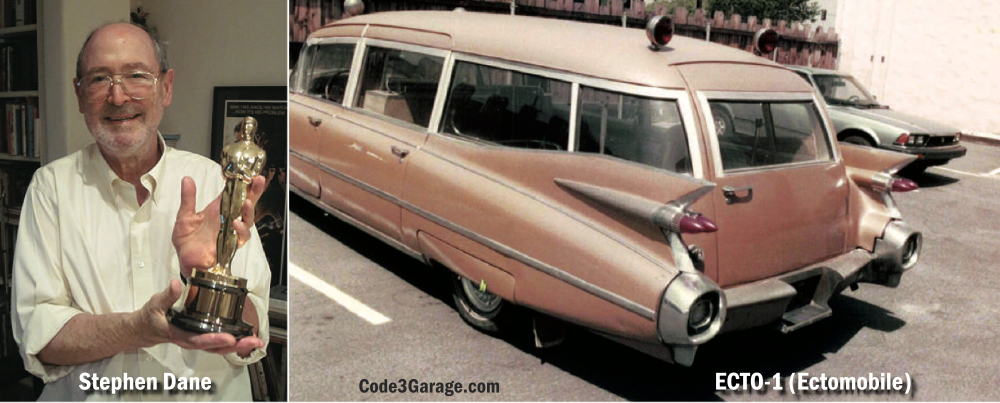
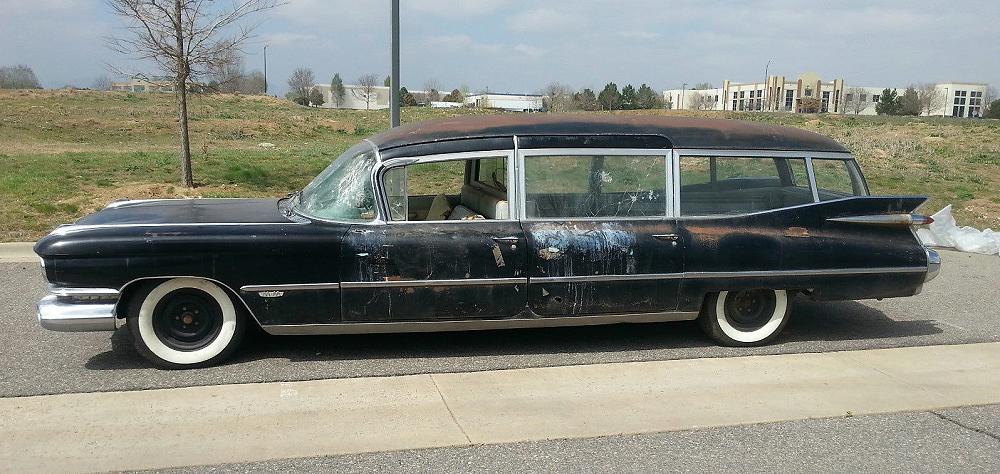
(The picture above shows how the Ectomobile ECTO-1 looked when first purchased)
Before I get to far, I want to recognize the designer and creator of ECTO-1. Stephen Dane, credited as a ‘Hardware Consultant’, designed and oversaw the development of the original ECTO-1. He only had two weeks to come up with the Ectomobile and all the other props for the movie. Stephen said that he got things off the shelf that looked good at the moment, and that he made a career out of “visual bull”. He definitely had an assortment of things to sort through. Accoring to Stephen Dane “When I was working on Blade Runner, I went out to the Tucson airplane wrecking area and came back with two forty-foot flatbeds full of aircraft junk, and that sensibility showed up in Ghostbusters.” True indeed. ECTO-1 if full of electronic aviation components. Stephen Dane also shopped for parts at the Apex Electronics/Apex Surplus Corporation in Los Angeles, California.
Here is one of Stephen Dane’s design drawings of ECTO-1 from September 12, 1983 (you can click to enlarge it):
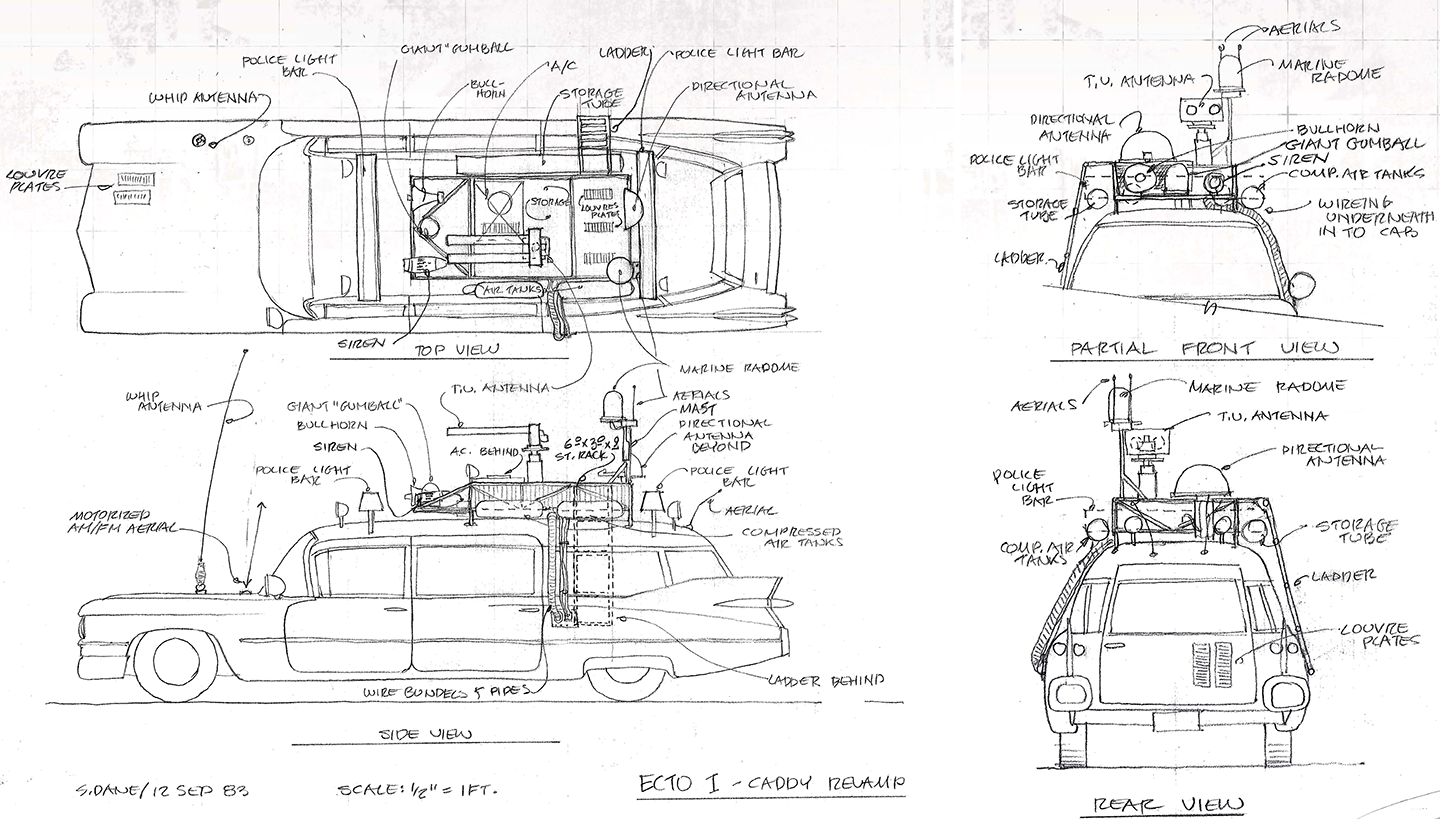
(Click to enlarge)
PAINT & BODY MODIFICATIONS:
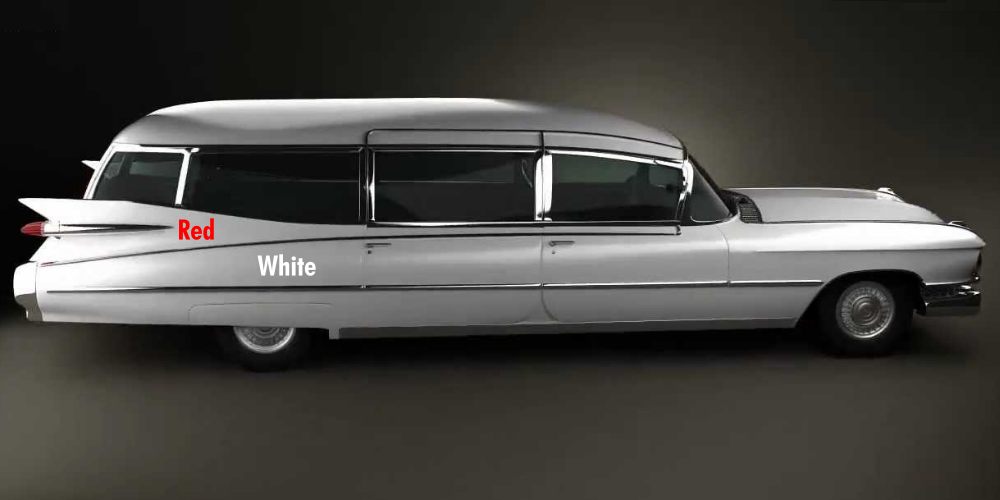
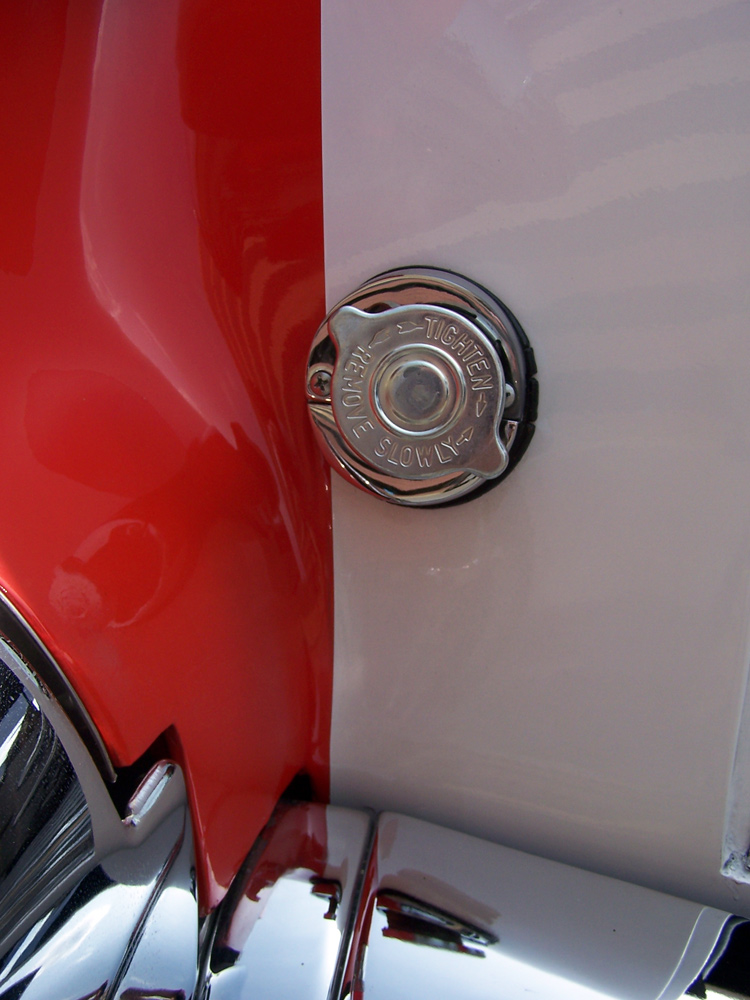
As mentioned above, the whole car was painted white, and the area above the side trim was painted red. The red was also on the backside of the fin and followed the fender down the rear of the vehicle.
It actually goes behind the chrome trim around the gas filler neck.
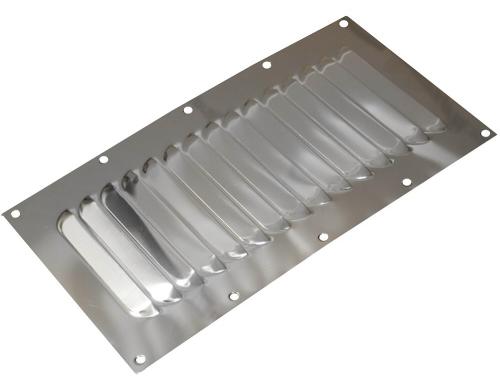
You’ll see that there’s a metal louvered vent on the right side of the rear door. That was not an original part of the car and was added. It’s actually (2) metal vents with 9-louvers each placed end to end (for a total of 18) and rivetted to the door.
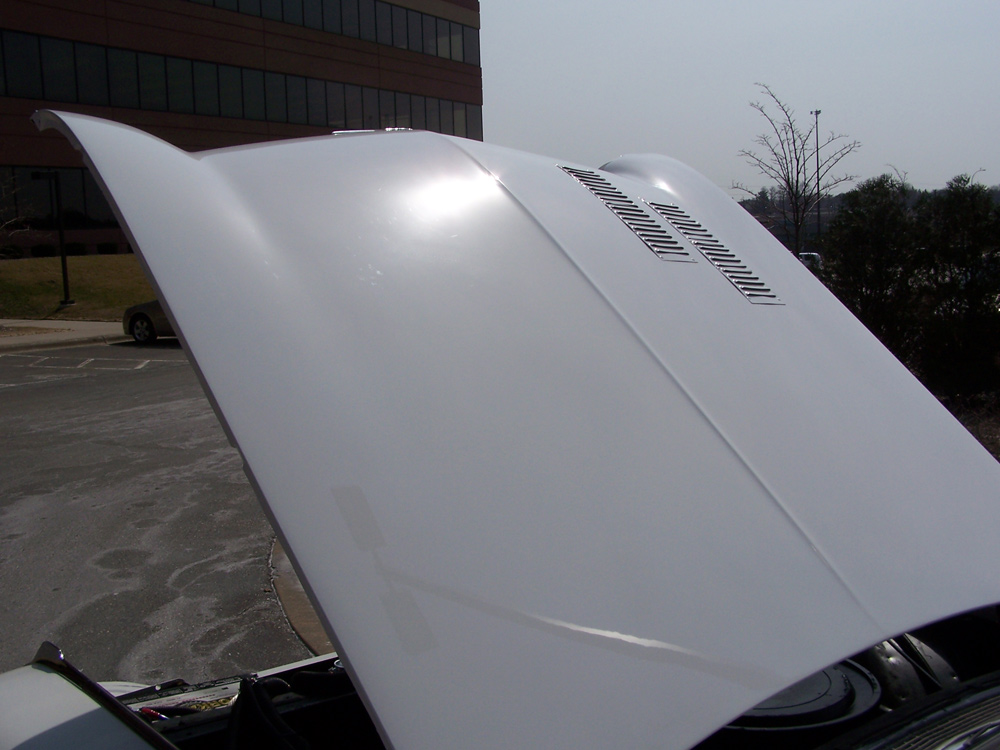
This vent configuration has also been added to the passenger side of the hood.
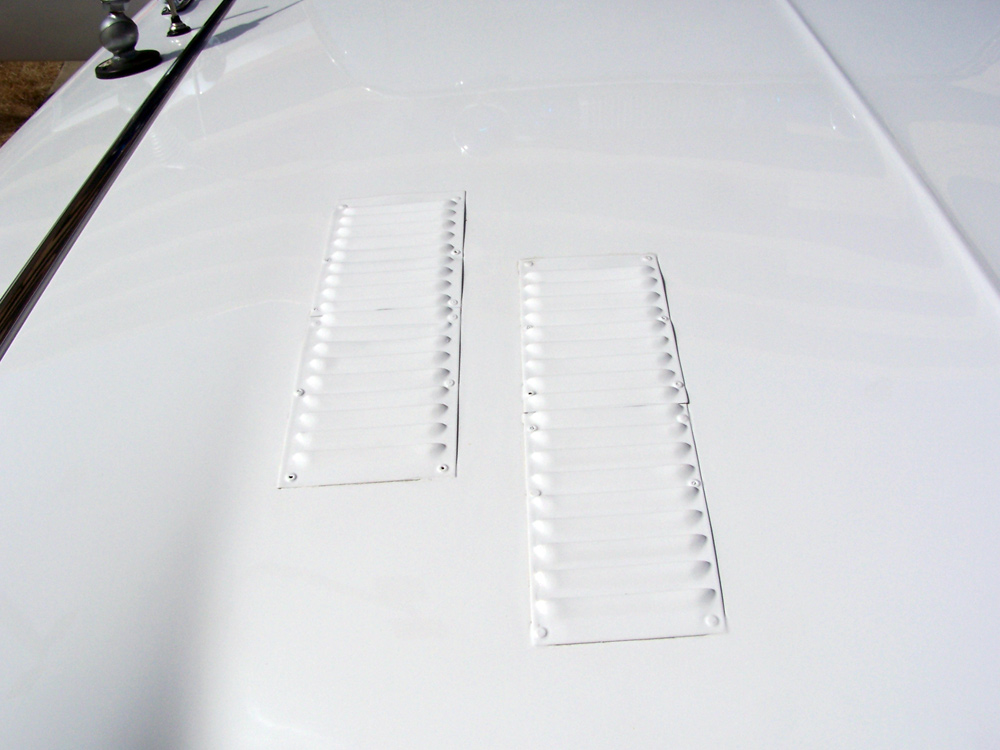
Again, (2) metal vents with (9) louvers placed end to end were rivetted to the hood. There were (2) rows of them on the hood. Both have a combined total of 18-louvers.
Finding steel louvered vents should not be to difficult.
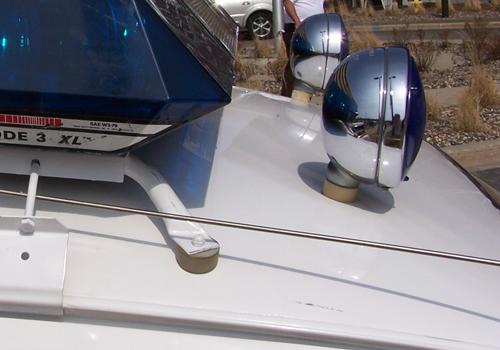
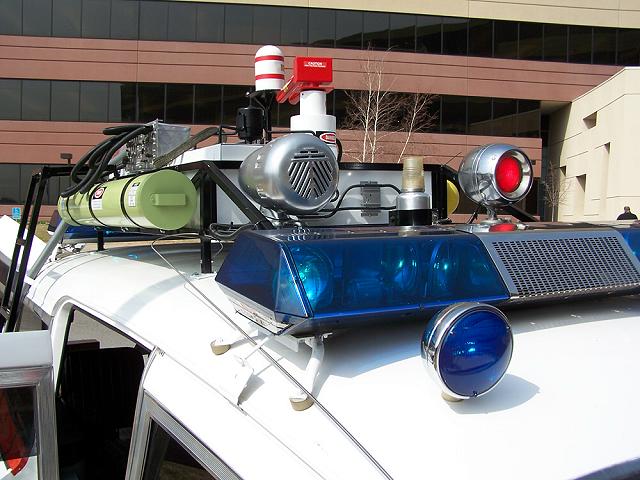
BLUE LIGHTBARS:

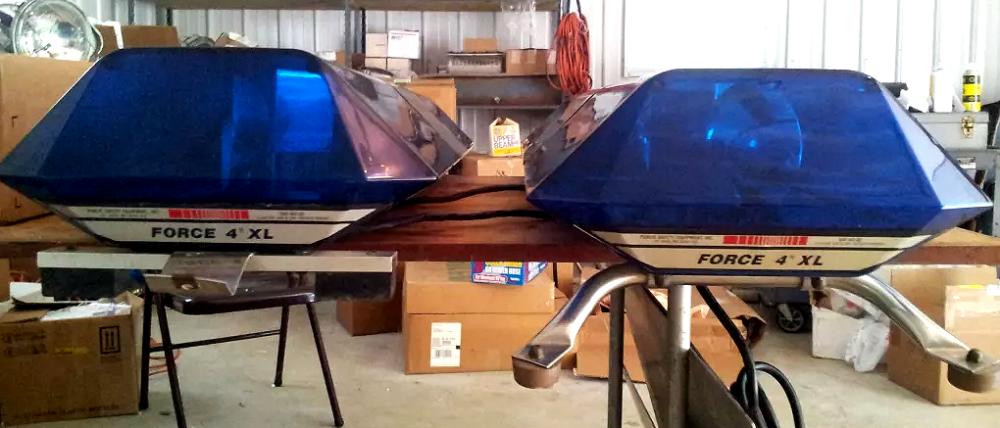
The ECTO-1 used 49″ Code 3 Force 4 XL Lightbars front and rear with blue domes and 11″ chrome center speaker housings.

If you look at the photo above, you can vaguely make out ‘Force 4 XL’ on the side of each light bar. More importantly, if you look at the lightbars you’ll notice that it’s a single rotator. You can even see the bulb standing in front of the rotator in the front lightbar (left end of photo).
The Code 3 Force 4 XL replaced the Code 3 XL. Both look similar in appearance and the blue lenses are interchangeable. The difference is the lights and rotators inside.
Here is a rotator with a bulb and reflector from a Code 3 Force 4 XL:

Here are the bulbs and reflectors from the Code 3 XL. Notice how there are either (2) or (3) PAR 36 incandescent bulbs per rotator versus the single rotator with a halogen bulb in the Code 3 Force 4 XL?

The reason I’m being so specific about this is because when the ECTO-1 was restored, the wrong lightbar was placed on the front of it.
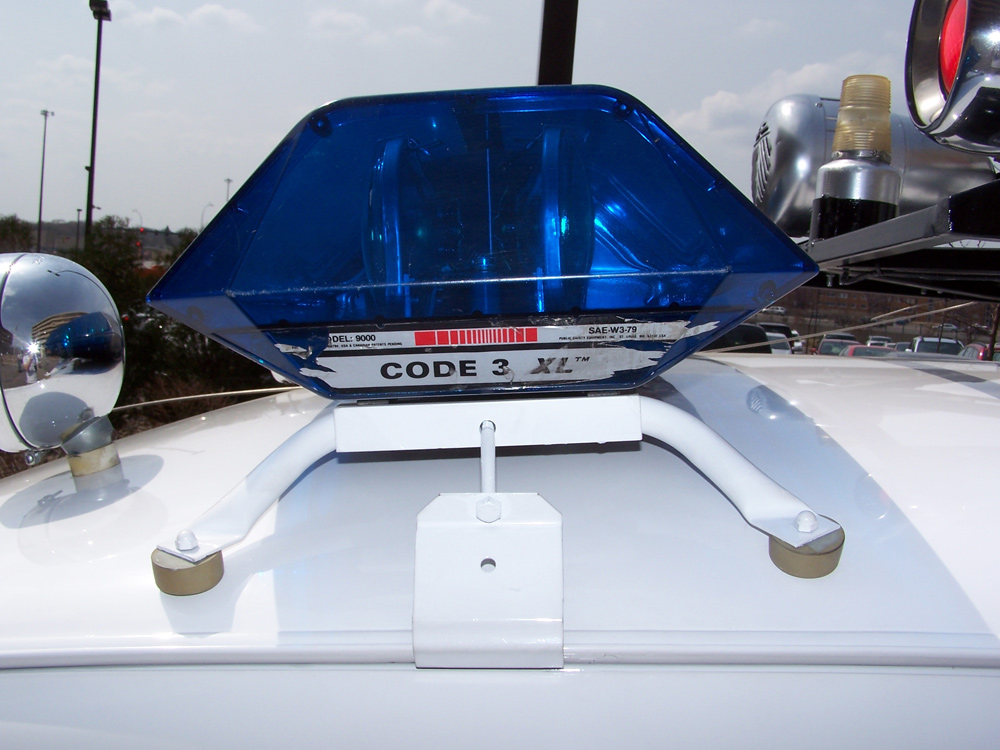
Here you can see that the lightbar on the front is clearly a Code 3 XL. Not because it says so on the sticker, but because you can see the older dual bulb rotators.
VIDEO – ENDING SCENE WITH BOTH LIGHTBARS FUNCTIONING AND VISIBLE:
PAR 46 ROOF LIGHTS:
You need (4) of these round PAR 46 chrome light housings. The Grote 64021 PAR 46 chrome housings are obsolete, but you can still find them on ebay. Another option is the Dietz 9-51 or 510.
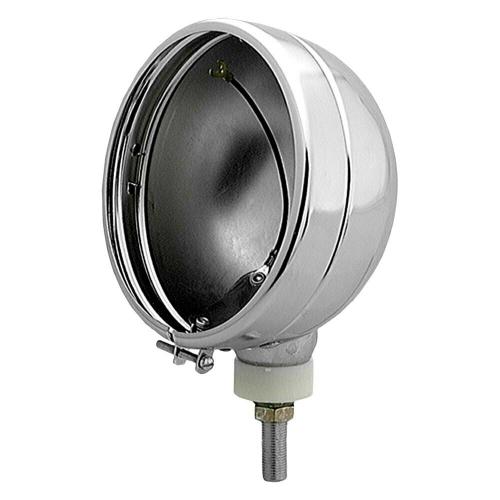
You’ll also need (4) blue PAR 46 bulbs.
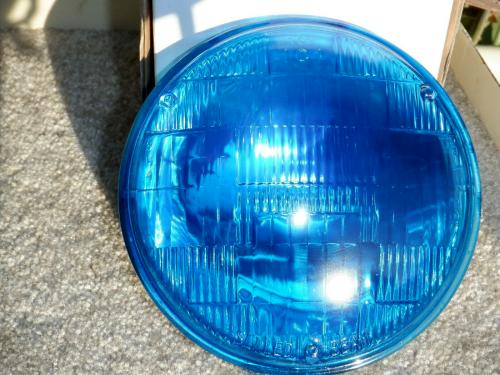
The lights on the front and back of the vehicle flashed on and off at the same time. They did not alternate like police lights, so they can be connected to a normal ‘hazard light’ relay.
Specifications:
Grote PAR 46 Light Housing: P/N 64021
Blue Bulb: GE, Sylvania or Wagner 4001B
FEDERAL SIGNAL MODEL 19 PROPELLO RAY:
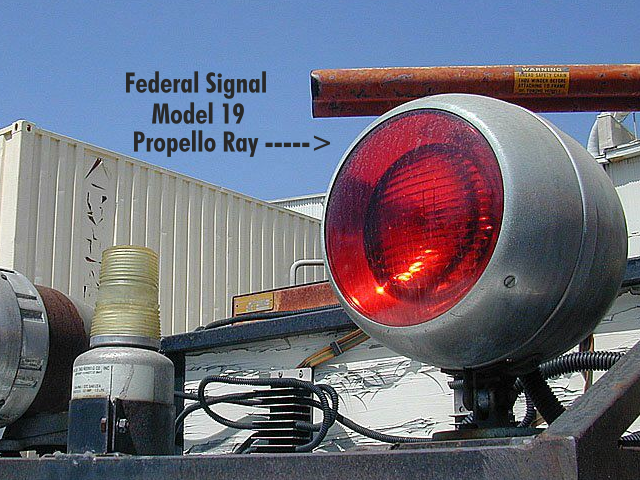
The red light on top of ECTO-1 is a Federal Signal Model 19 Propello Ray. Note the red lens on the front.
When ECTO-1 was restored, someone apparently lost the red lens. To make things worse, it appears that they painted the bulb red.

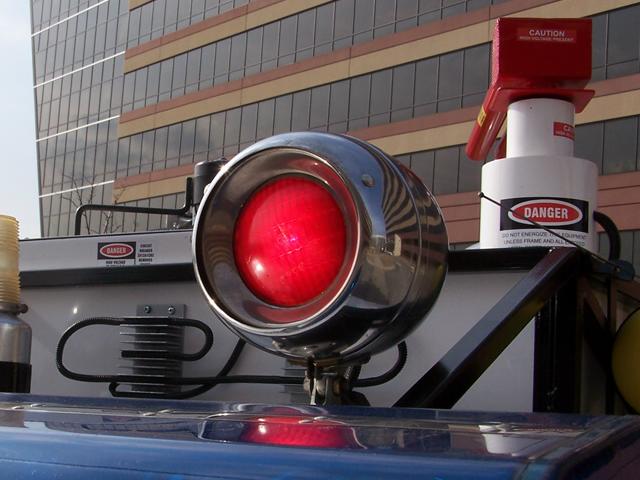
Here is a Propello Ray red lens:

If you find yourself in the same situation, do not paint the bulb. These lights use a PAR 36 bulb. You can buy a red PAR 36 bulb P/N 4414R.
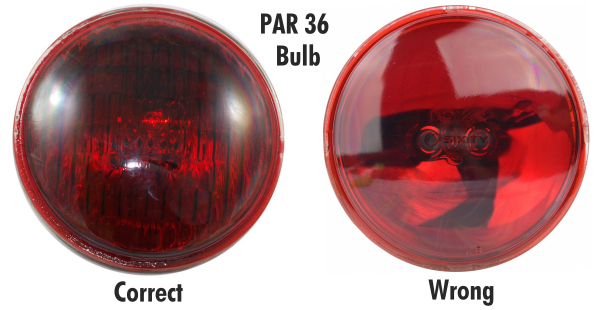
If you replace the bulb, do not use a clear spotlight style bulb (above right). Use a flood light style bulb (above left). If you watch the video below, you will see the bulb spinning. You can see that it would be harder to see a smooth spotlight style bulb spin.
Specifications:
Federal Signal Model 19 Propello Ray
PAR 36 bulb (P/N 4414R if you don’t have a red lens)
VIDEO – FEDERAL SIGNAL MODEL 19 PROPELLO RAY:
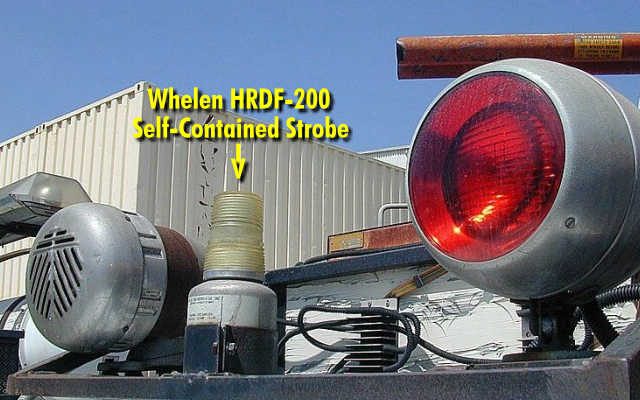
WHELEN HRDF-200 SELF CONTAINED STROBE:
In the middle of the roof rack and to the left of the Federal Signal Model 19 Propello Ray is a Whelen HRDF-200 self contained aviation anti-collision strobe light. This light has been replaced by model HR, CFA-14/28 (Model: HRCFAW Part Number: 01-0770029-30).

The gray mounting flange is removable. Here is the Whelen HR CFA strobe:
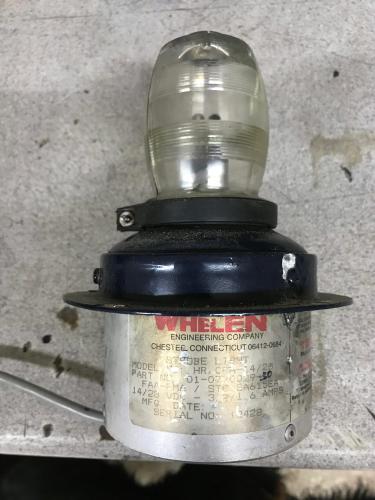
If you need a new clear lens to match the original one used on ECTO-1 it’s Whelen 68-2130024-30 Model A402W Clear Dome.
![]()
![]()
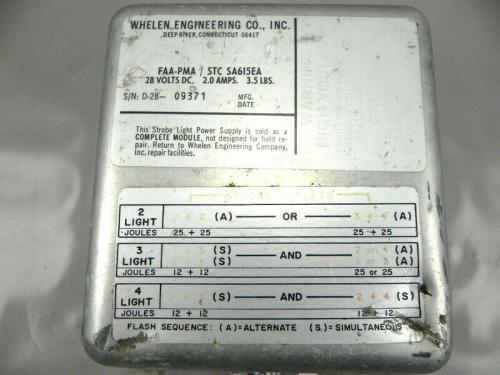
Here are the Whelen anti-collision strobe light part numbers:
 (click to enlarge)
Specifications:
Whelen Strobe Light: Whelen HRDF-200 self contained aviation anti-collision strobe light
Replacement: Model: HRCFAW Part Number: 01-0770029-30
Replacement Lens: Whelen 68-2130024-30 Model A402W Clear Dome
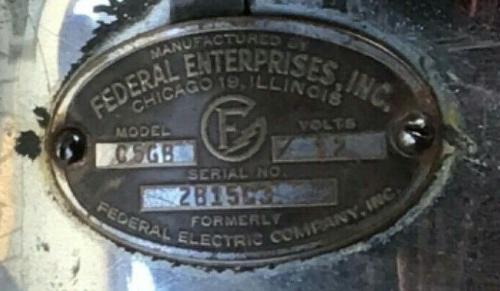
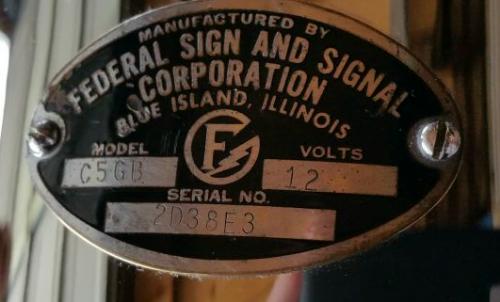
FEDERAL SIGNAL MODEL C5GB SIREN:
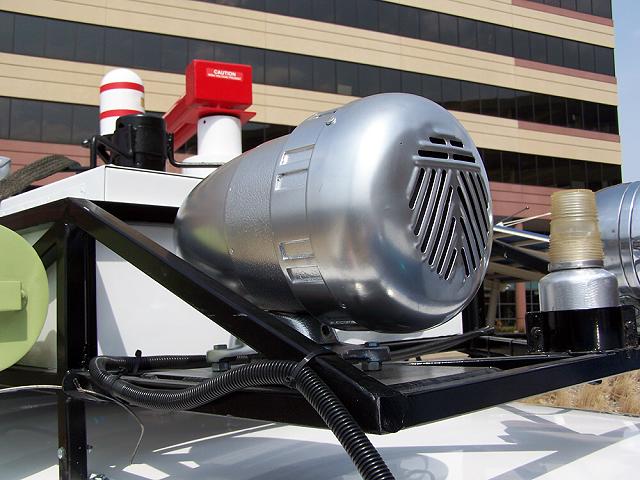
On the right (passenger side) from corner of the roof rack (opposite of the Federal Signal Model 19 Propello Ray) is a federal C5GB mechanical siren. The siren isn’t actually used, so it doesn’t matter if it works. The ECTO-1 used a special siren sound that we’ll discuss later.


THE ‘ECTO SIREN’:
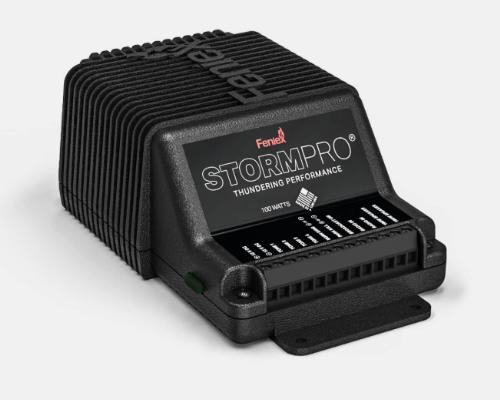
Since I touched on the topic of sirens, lets get to it. As you know, the ECTO-1 has it’s one unique siren. Some people choose to download the siren sound files, and play them as an MP3 file over a speaker. The problem is that there are (3) parts to the siren – powering up, the siren loop, and powering down.
Feniex (manufacturer of emergency lights and sirens) offers the ‘ECTO Siren’ in it’s Storm Pro 100 and 200 watt sirens. I would suggest you look in to one of those if you’re going through all of this trouble to build your own ECTO-1.
You’ll need a 100-watt siren speaker. You can either get one from Feniex, or buy a used one. You can find used siren speakers for under $100.
Resources:
Sound Files: http://www.hprops.com/sounds/
Fenix Sirens: Feniex Storm Pro 100-Watt
Feniex Speaker: Feniex Triton 100-Watt Speaker
VIDEO – FENIEX STORM PRO SIREN WITH ECTO SIREN:
UNITY SPOTLIGHT:
The spotlight is a Unity S6 6-inch spotlight with a blue lens. These spotlights use a Par 46 bulb, so you need a blue lens to fit a PAR 46 bulb. If you can’t find a lens, you could resort to using an actual blue bulb.
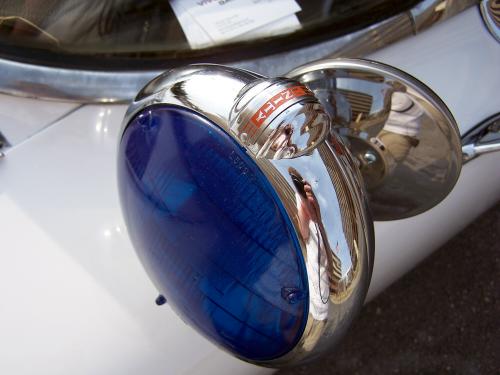
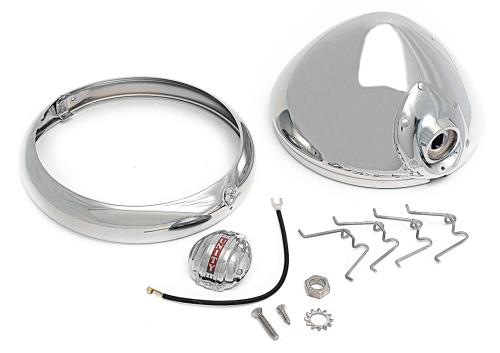
Notice that hump on the trim ring that says ‘Unity’. This style of spotlight was used from 1945-1971. You can order complete vintage (new) unity spotlights for your 1959 Cadillac directly from Unity, or get a new shell and ring kit.
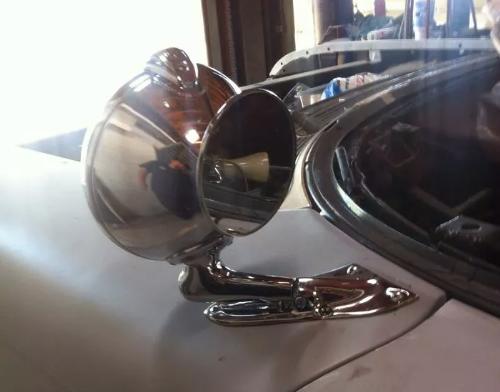
The hardest thing will be to find a Unity S6 (6-inch) spotlight with the optional mirror attached to it.
Here’s a PAR 46 blue bulb. You can usually find someone selling these on ebay.
Specifications:
Unity Model: S6 (1945-1971 style)
Shaft Length Series: “P” Length Shaft is 12 5/8″ Exposed Shaft and 18 1/8″ Center to Center.
Mounting Kit: P/N 138 (LINK)
Blue Bulb: GE, Sylvania or Wagner 4001B
Vintage Shell & Ring Kit: 6570-0032 Vintage Spotlight 6″ Shell & Ring Kit (S6) (LINK)
Unity USA: https://www.unityusa.com/
GRIMES STROBE LIGHTS:
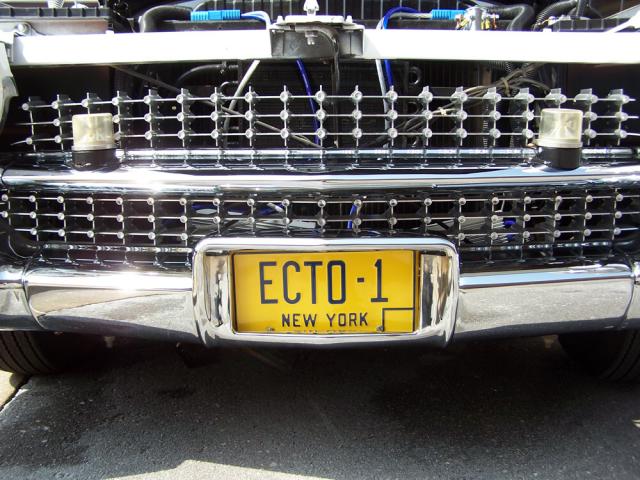
ECTO-1 had (2) Grimes anti-collision strobe lights mounted on the front grill.
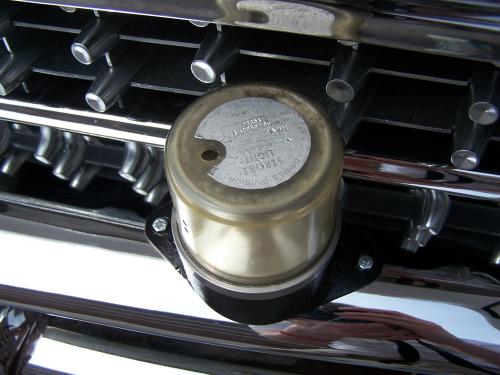
These are Grimes PN #30-0437-100 and uses clears lens PN 30-0504-1
![]()
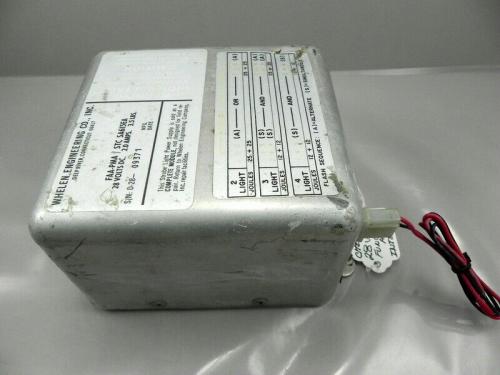
WHELEN POWER SUPPLY:
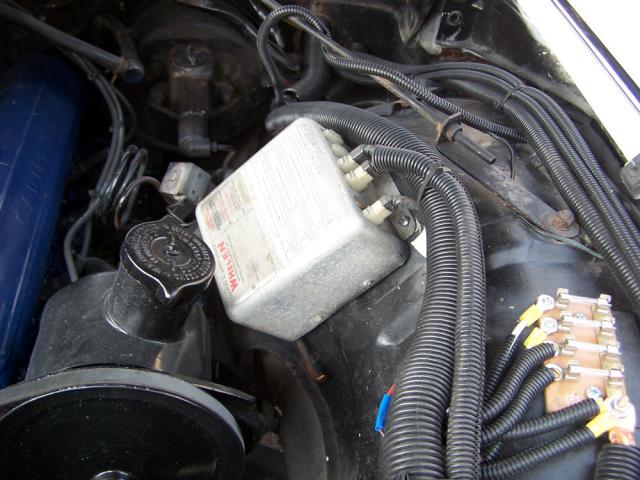
The Grimes strobes are powered by a Whelen strobe power supply mounted to the drivers side inner fender.
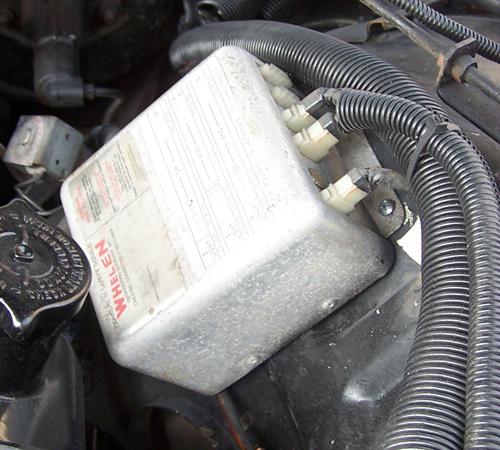
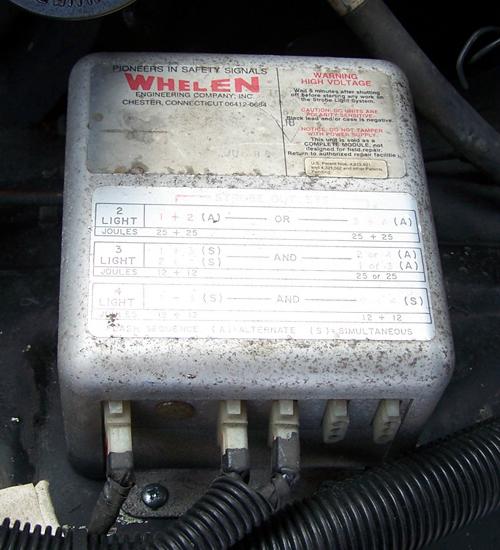
ECTO-1 used an aviation model power supply. They’re in a silver metal housing. As far as I know, the power supplies used for automobiles were always in a black housing.
The closest power supply I can find to the one shown (appearance wise) is the Whelen A413 HD-28 power supply.
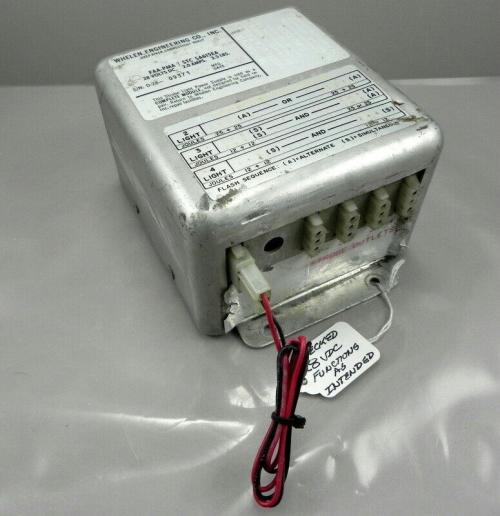
This of course doesn’t matter if you’re not concerned about the details under the hood. If that’s the case, then you just need a strobe power supply with (2) outlets.
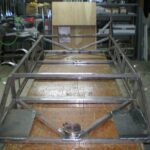
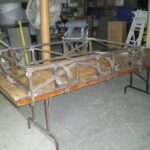
ECTO-1 ROOF RACK:

It’s time to start building. You’ll need to build a 36-inch wide by 74-inch long roof rack out of 1-inch steel square tubing.
Here’s some drawings to help:

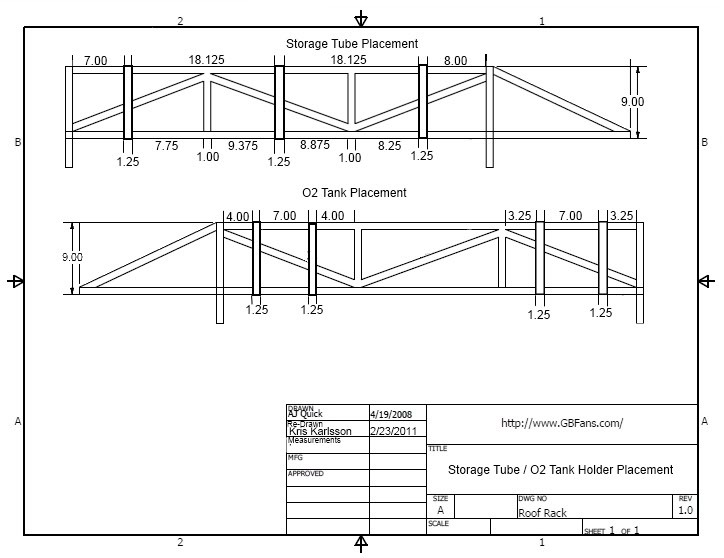
Here are some more visual references (click to enlarge):


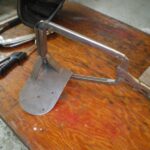

ECTO-1 LADDER:
The ladder is also made out of 1-inch square steel tubing. Here’s a drawing to help: 
Above you can see where the ladder bolts to the roof rack, and below you can see where it bolts to the side of the car.
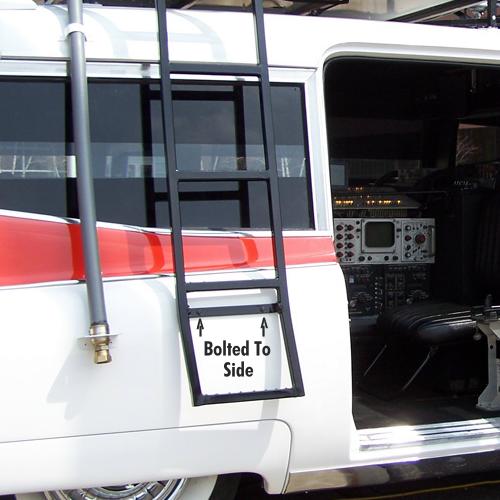
Here’s (2) more visual references (click to enlarge):
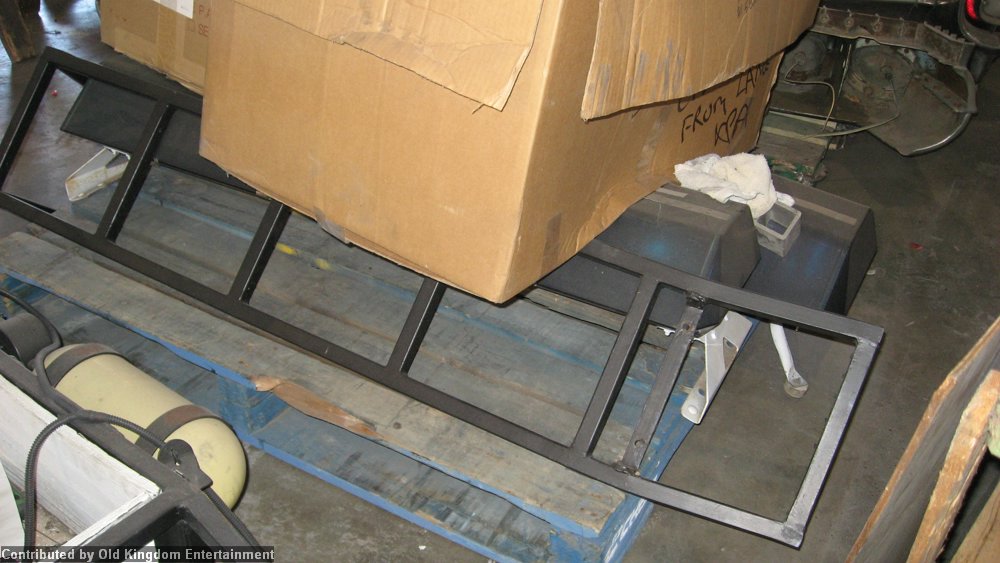
Notice the details to the top of the steps…
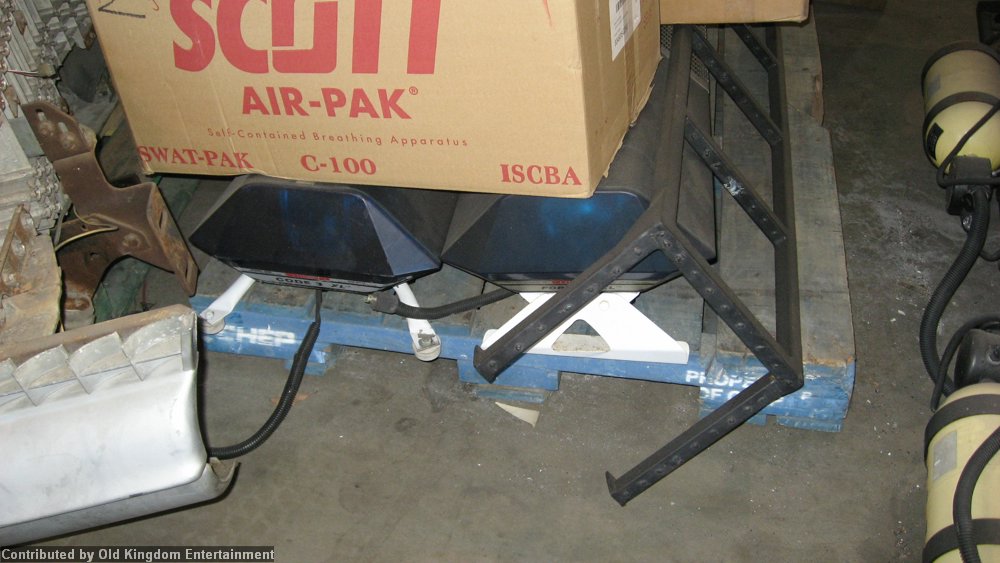
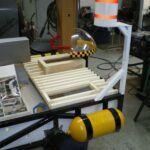
THE ROOF RACK COMPONENTS:
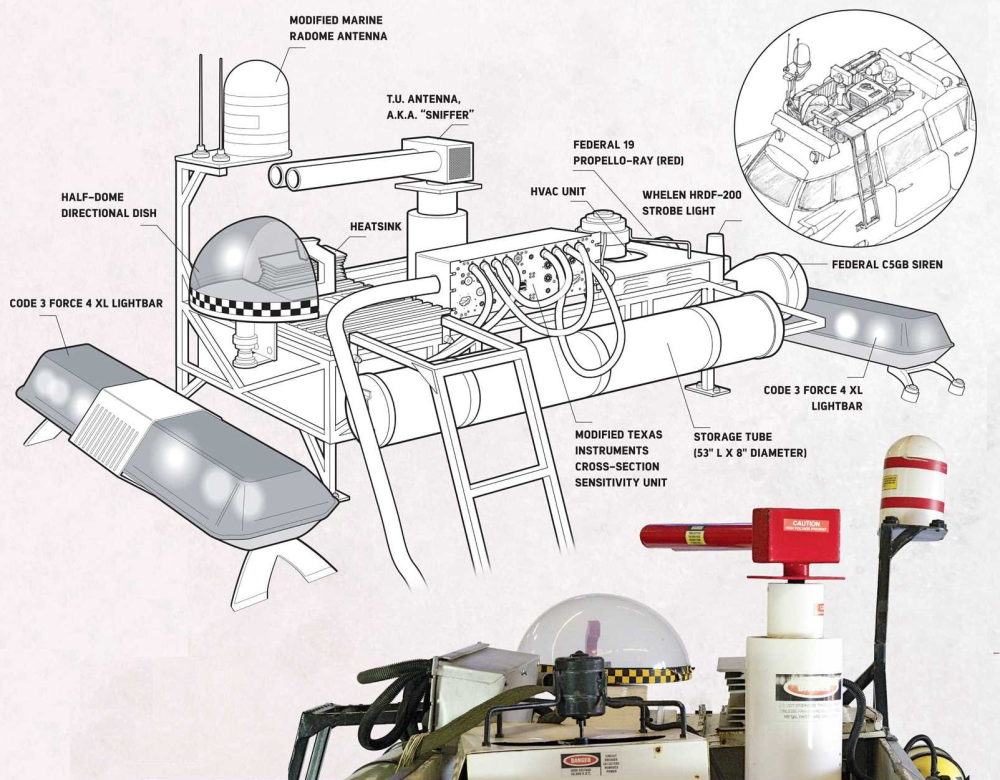
Let’s get in to the components that go on or in the roof rack. This is where you’re going to have to get creative and start building things.
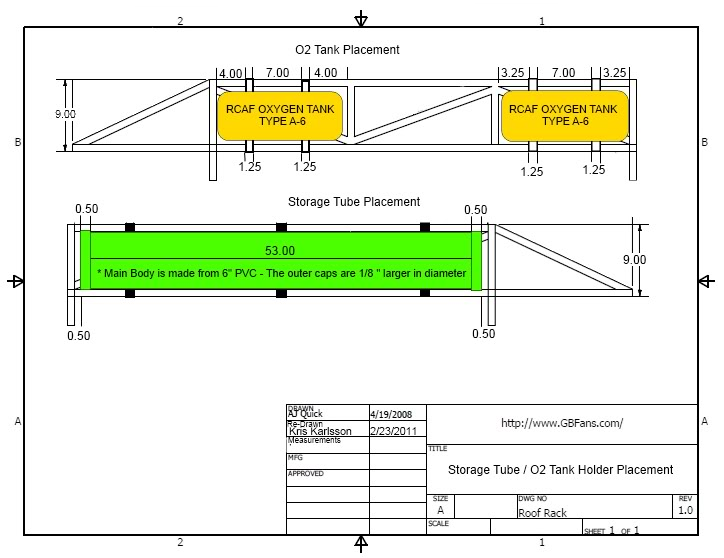
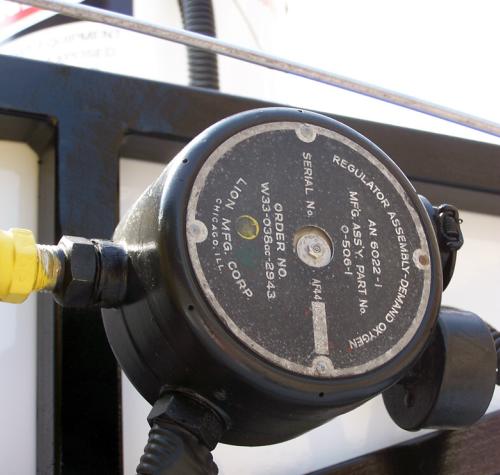
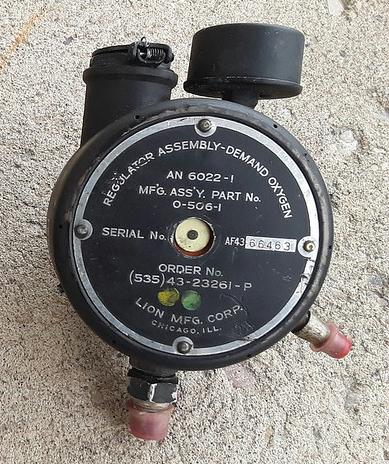
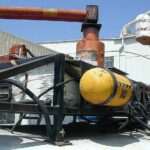
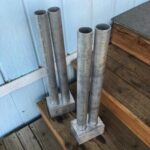
– – A6 Oxygen Tanks:
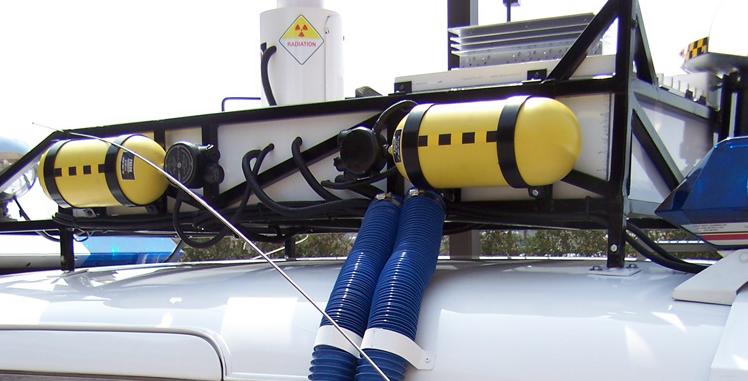
The drivers side of the roof rack holds (2) yellow A6 WWII aviator oxygen tanks. They are 5-5/8″ in diameter, and 13-7/8″ long.
They were equipped with a Lion MFG Corp AN 6022-1 O-506-1 regulator.

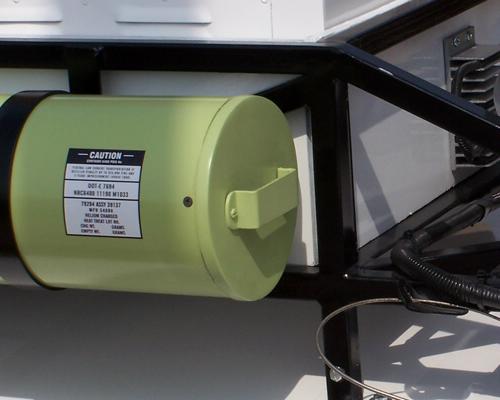
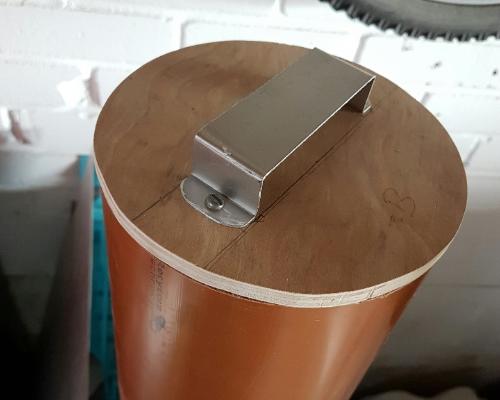
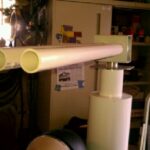
– – Storage Tube:
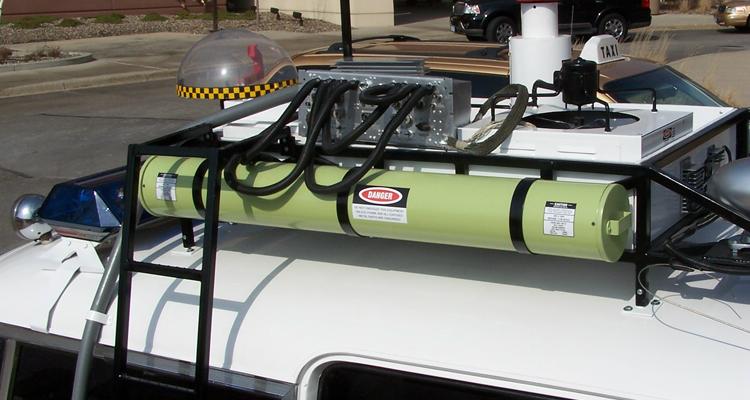
The passenger side of the roof rack has a chartreuse green storage tube made from a 8-inch by 53-inch schedule 40 PVC pipe. The ends are capped with a piece of wood (held in place with screws on the outside edge of the tube), and the handles are made out of flat sheet metal.

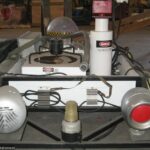
– – Half Dome Directional Dish:
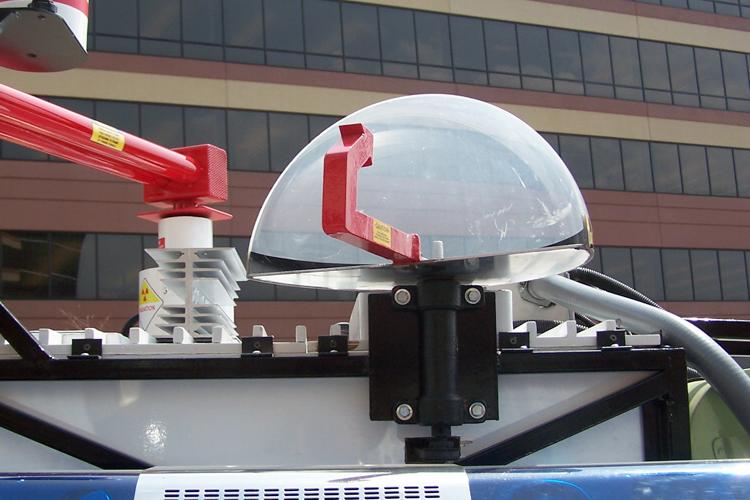
There is a half-dome radar type dish on the back of the roof rack. They dish is attached to a Chicago Die Casting 10-1/8X5/8 Mandrel 1560 that’s bolted to a plate welded on to the back of the rack.
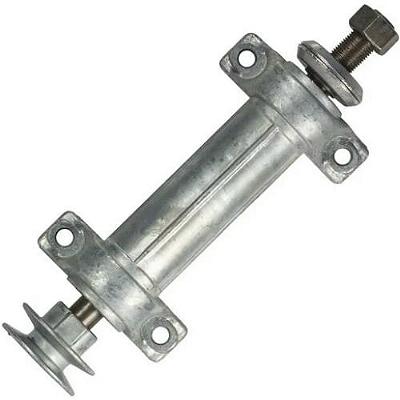 (Chicago Die Casting 10-1/8X5/8 Mandrel 1560)
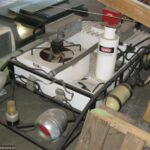
The mandrel has a pulley on the bottom end of it that has a belt that passes through the white box on the roof rack that houses a Dayton 1LPW4 12V motor that turns the dish.

I’m not sure if the person that built the dish below used the Dayton motor, but I think this picture gives you a better understanding of the setup.
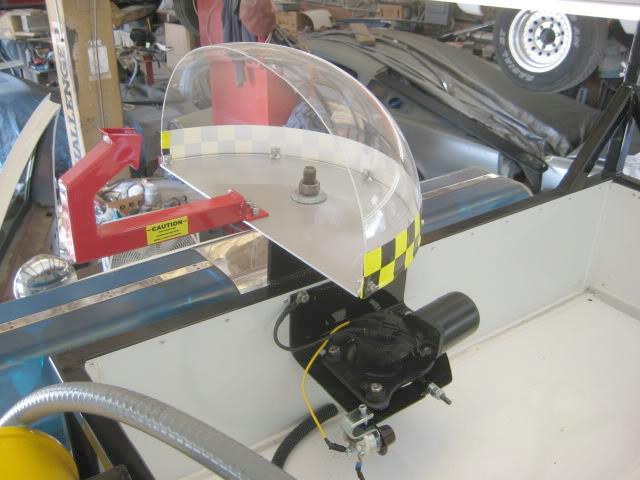
I’ve seen this clear dome described as an 18-inch dome and a 16-inch dome. The clear dome is 1/4 of a 16-inch (or 18-inch) clear acrylic dome (globe). It will take some careful cutting, but shouldn’t be too bad. They’re relatively cheap.
Check out:
https://www.1000bulbs.com/ (has 16 & 18 inch globes)
The base can be made out of wood or metal.
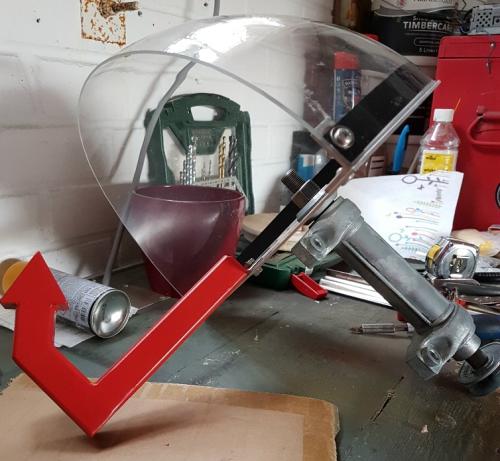
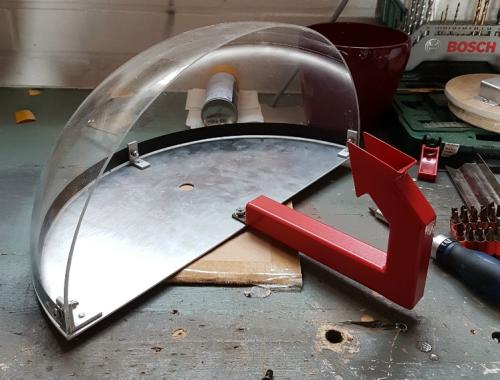
Likewise, you’ll have to make the red antenna piece as well.
The half-dome directional dish is used to detect and listen to supernatural conversations. It’s monitored from a control unit next to the passenger rear jump seat.
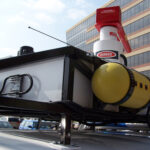
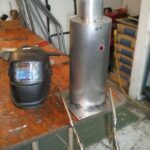
– – Radome Antenna:
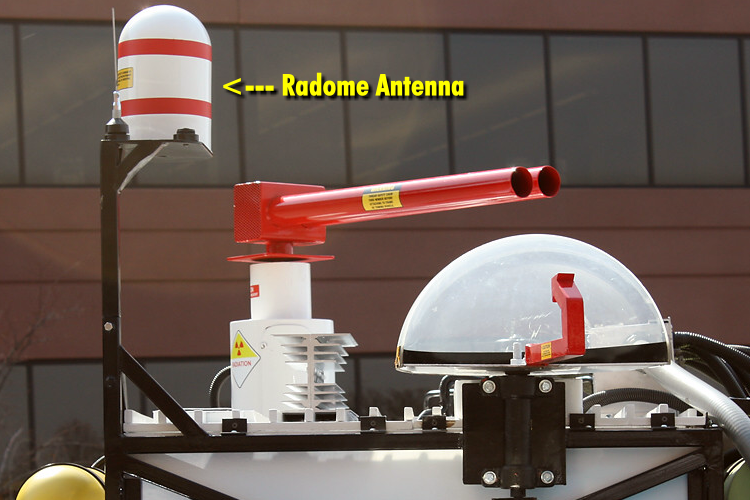
People have argued about the dimensions of the Radome antenna. If you look at the base of the antenna, you can see that it’s welded to the steel plate it sits on. So we know it’s metal. If you look just below the bottom red stripe, you’ll see a weld line.
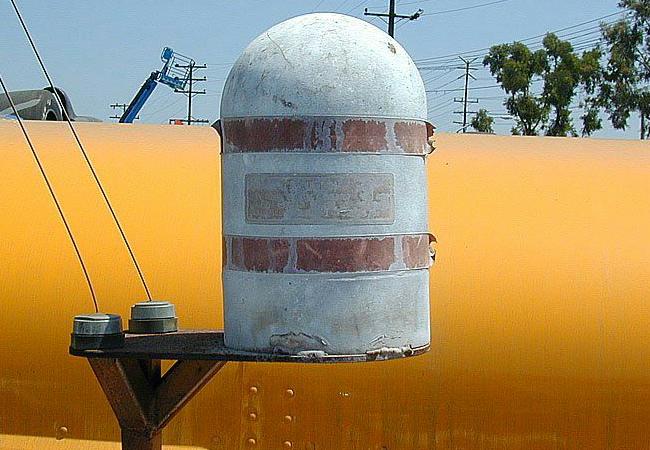
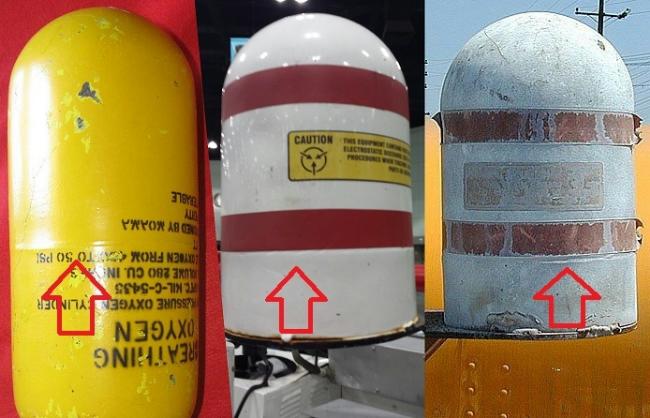
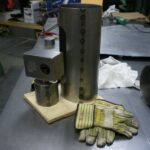
I and others believe that the Radome antenna was made out of a surplus A6 oxygen tank. The same surplus ones that were mounted on the drivers side of the roof rack. In the photo below, you can see an A6 tank on the left, the restored Radome antenna in the middle, and a photo of what it looked like before restoration. You can see where there is a welded seem in the same place on the A6 tank and the Radome antenna. The prop department had to have this car done in 2-weeks, and they would have created things as quickly as possible. Since they had some of these A6 tanks, it makes sense that they would have cut one to create the 6-inch x 9-inch antenna.
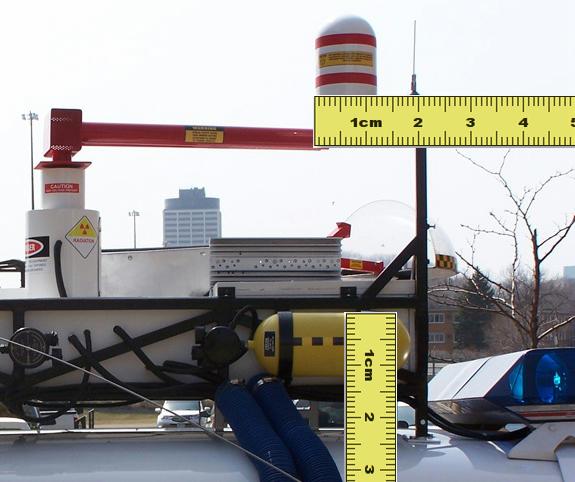
Here is the spacing for the red stripes:
The rear of the mounting plate has (2) NMO VHF antennas.
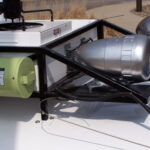
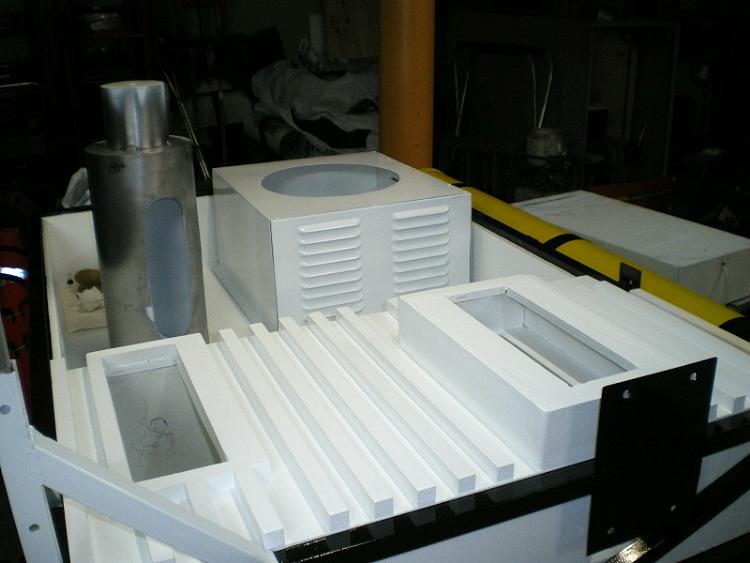
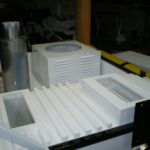
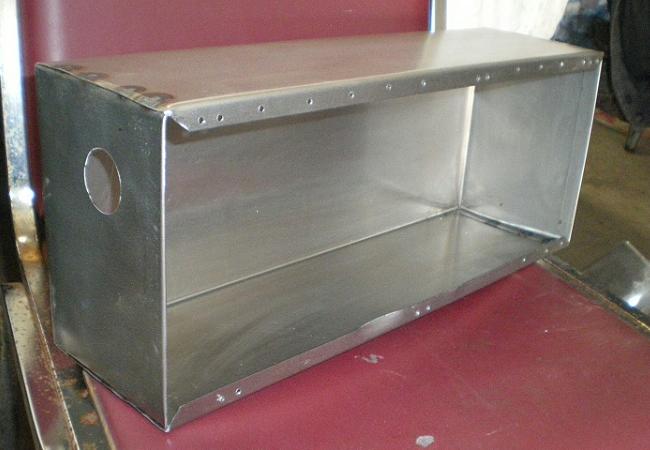
– – The White Wooden Box:

So at this point, I need to address that your roof rack is going to need a white wooden box to fit inside of it. There are a few components that sit inside of that box. There is a wooden box inside of the main box at the rear. The picture below will give you a visual reference as to how the top of the rear box is made, and how wide it is. As you can see in the photo above, that box was enclosed in the original design, but left open after restoration.

The rectangular openings or covered with metal louvered vents. This rear box also has a large heat sink mounted on top of it.

– – Roof Mounted Heat Sink:
The photo above should give you and idea how big the heat sink is. It’s actually (2) matching heat sinks bolted back to back, and then stood on it’s side and attached to the box.

There are also (2) heat sinks on the front side of the box.

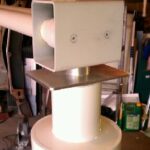
– – Roof Mounted HVAC Unit:
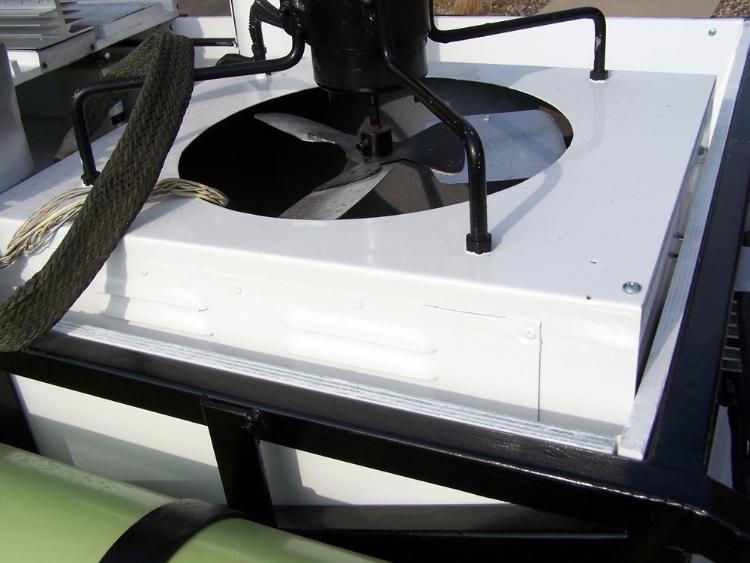
In the passenger side front corner of the box is a HVAC unit (air conditioner).
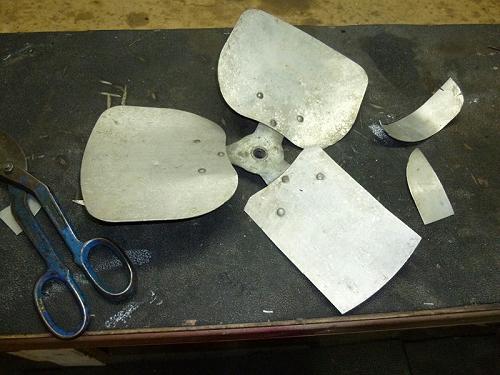
It doesn’t really do anything. It’s just a metal box with louvers with a motor suspended over it supporting a 12-inch fan blade inside the box.
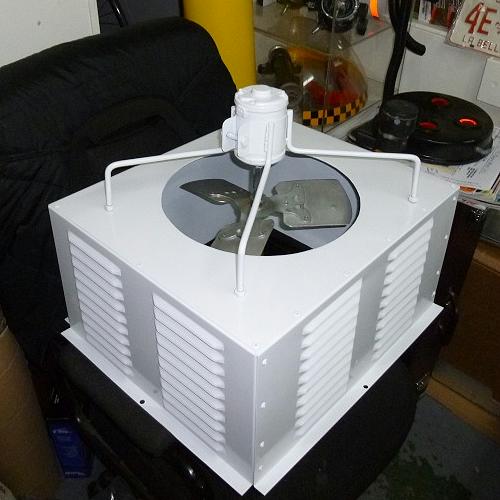
If you can’t find a 12-inch metal fan, you can always trim down a larger one.
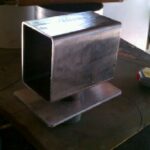
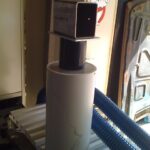
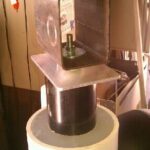
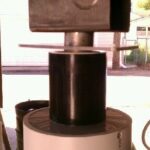
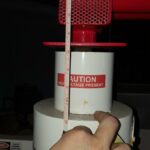
– – T.U. Antenna (AKA Sniffer) (AKA PKE Meter Extension):
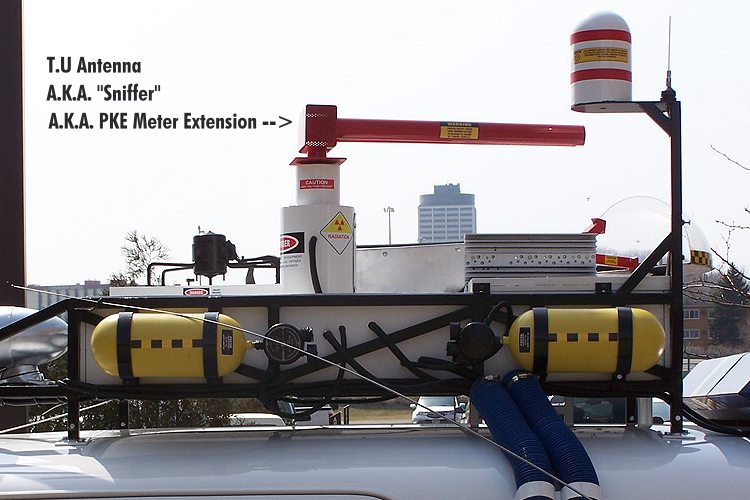
Here is another item you’ll need to build. I have no idea what the measurements are of the actual one used on the real ECTO-1.
I’ve seen these built out of metal and PVC.
The metal ones have a 16-inch tall x 7-inch round base tube. Not sure what the middle section is. The top tube that the box sits in is 1-1/2 inch in diameter. The red metal box seems to be roughly 4-inches tall, 3-inches deep, and 5-1/4 inch wide. The “sniffer” tubes appear to be 2-inches in diameter, but the length is unknown.
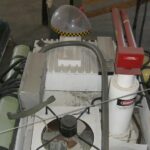
The one built out of PVC used a 4-inch x 5-inch piece of steel tube channel sitting on a 1-1/4 inch aluminum pipe spacer, then a 1/4-inch aluminum plate, then another 1-1/4 inch aluminum pipe spacer. The secondary body was a piece of 4-inch PVC pipe, and the primary body was a 6-inch PVC pipe. The sniffer barrels were made out of 1-1/4 inch PVC pipe. It’s all held together by 1/2-inch threaded rod.
If you look at the photos below (click to enlarge), you’ll get an idea of how it went to together. This is definitely an item you’ll have to use your imagination with.


– – VIDEO – T.U. ANTENNA (“SNIFFER”) IN ACTION:
If you really want to get creative, make the “sniffer” sweep back and forth.
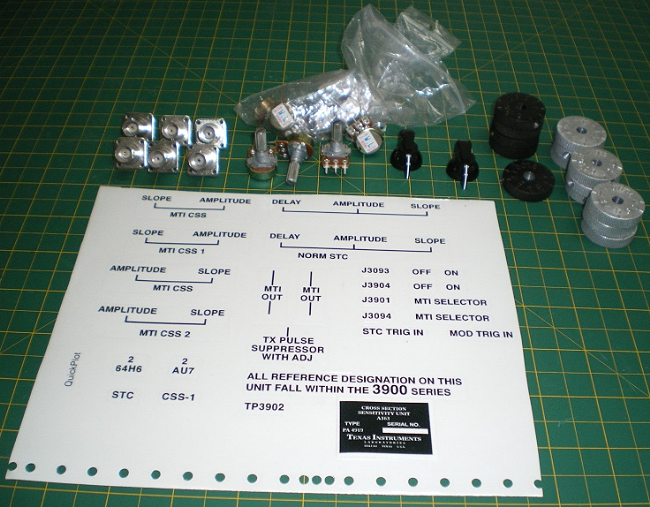
– – Texas Instruments ASR-5 Cross Section Sensitivity Unit:

One of the hardest pieces to come up with on the exterior of the ECTO-1 is the Texas Instruments ASR-5 Cross Section Sensitivity Unit FA-4919. This is part of the Texas Instruments Airport Surveillance Radar (ASR-5) system. In the 1970’s, there was an ASR-5 system at every major airport. It’s the primary radar used by air traffic controllers to manage airport traffic. ASR is designed to provide relatively short−range coverage in the general vicinity of an airport and to serve as an expeditious means of handling terminal area traffic through observation of precise aircraft locations on a radarscope. The ASR can also be used as an instrument approach aid.
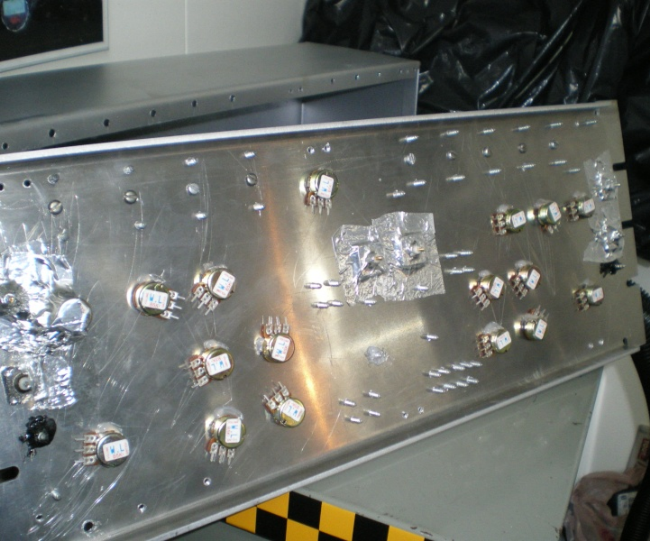
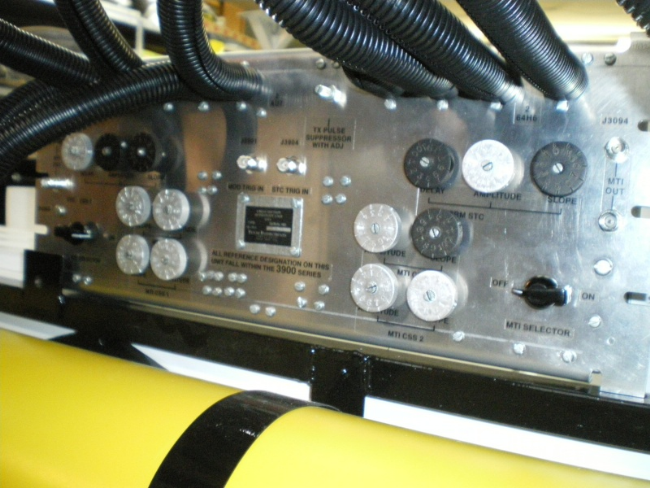
It’s unlikely you’ll find one 50-years later. People either find something that looks similar, or build their own from scratch. To do so, they start with a 17″x8″x8″ metal box with knobs on it.

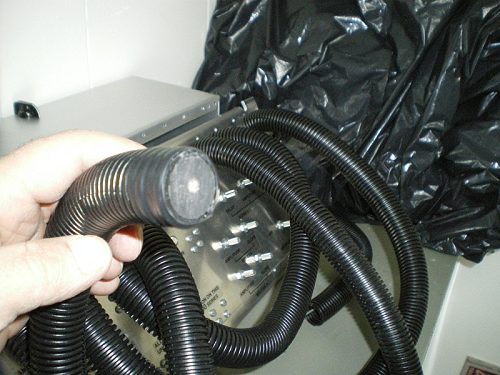
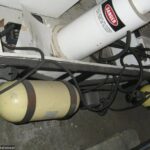
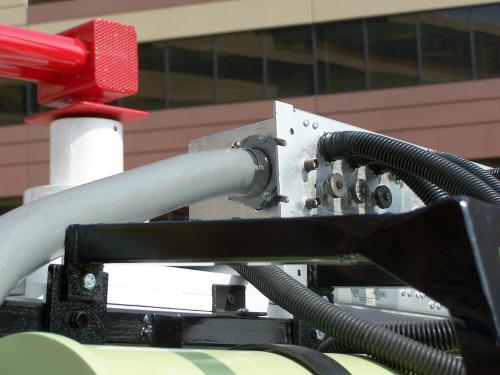
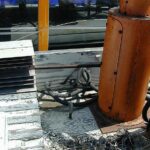
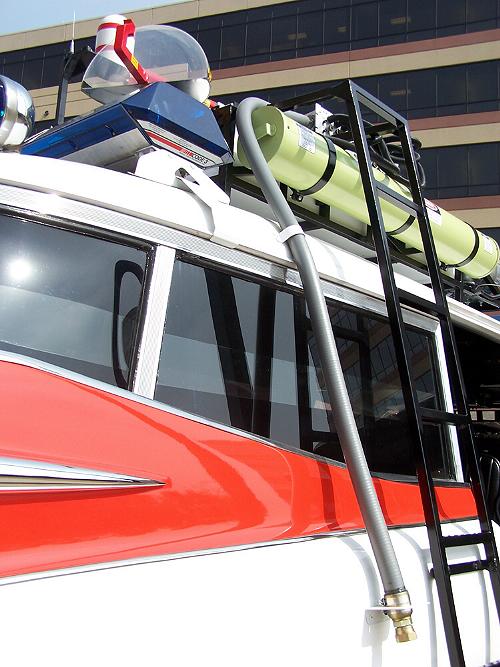
– – Electri-flex Liquatite (Liquid Tite) Grey Hose:

There is a 1-inch Electri-flex Liquatite (ligquid tite) flexible conduit that runs from the side of the T.I. ASR-5 box down the passenger side of the car.
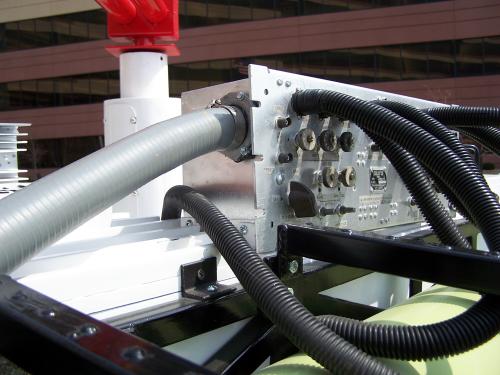
– – Blue Wire Bundle Tubes:
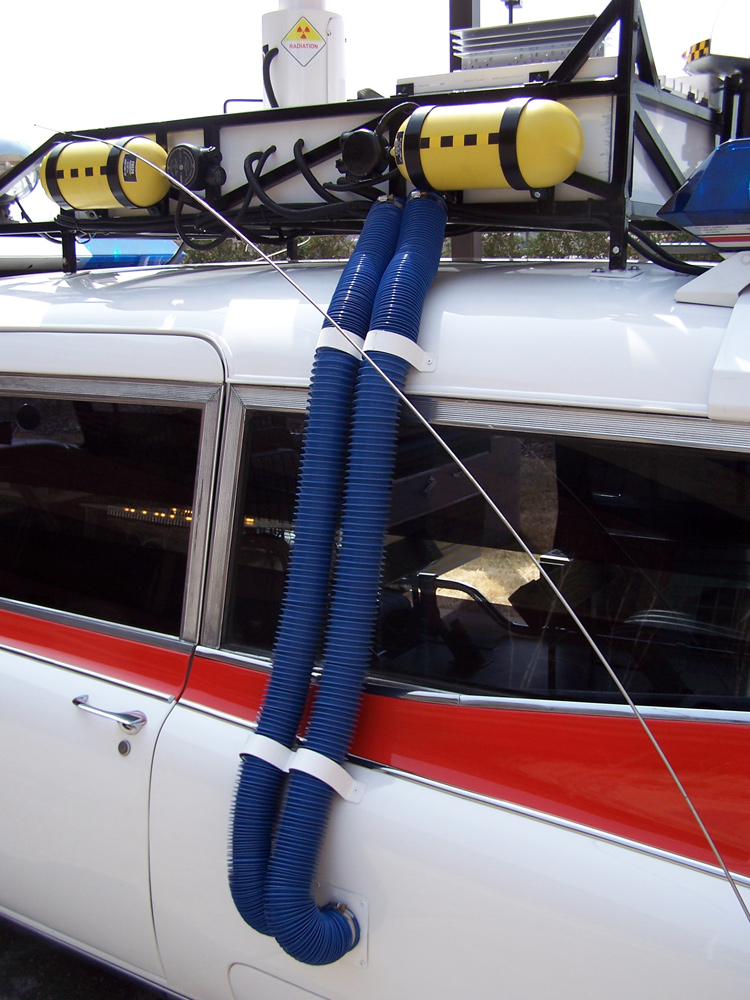
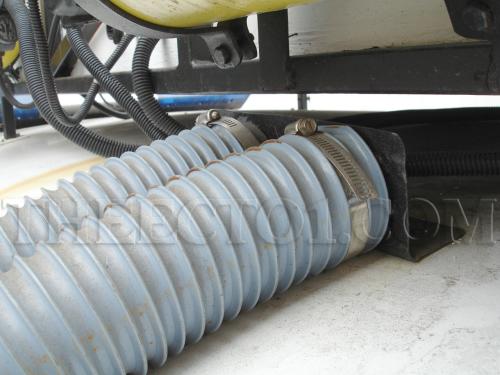
Those (2) blue tubes are suppose to route all of the wiring for everything on the roof of the car in to all of the electronical devices inside of the car. You can see the straps that hold it to the body, as well as the piece
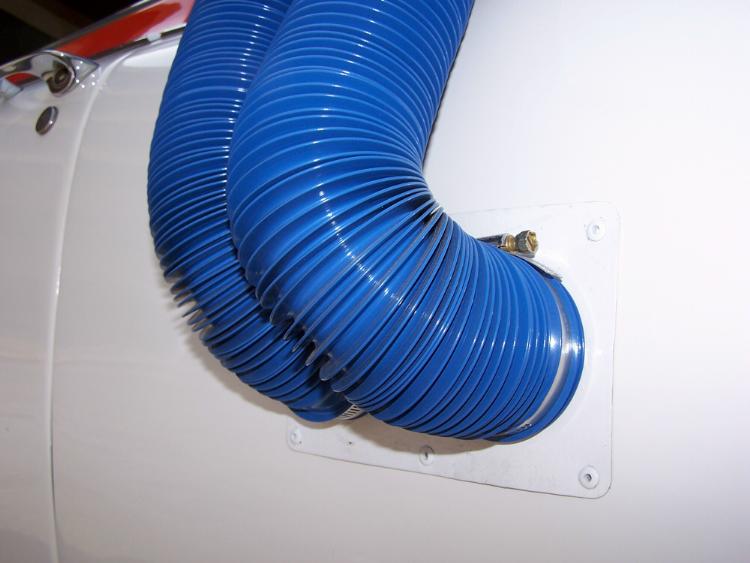
You can see that one of the blue hoses actually allowed wiring to pass through it. This was likely the wiring that activated the lights ad the motors that powered the rotating radar antenna and sweeping “sniffer” antenna.
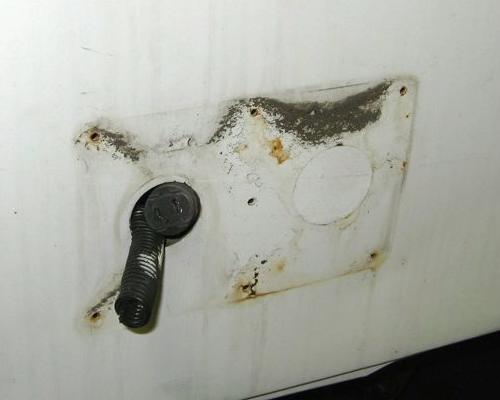
The top end of the hose had a bracket mounted to the roof of the car under the roof rack that the hoses connected to. If you go up to the first photo, you’ll see that it’s missing.
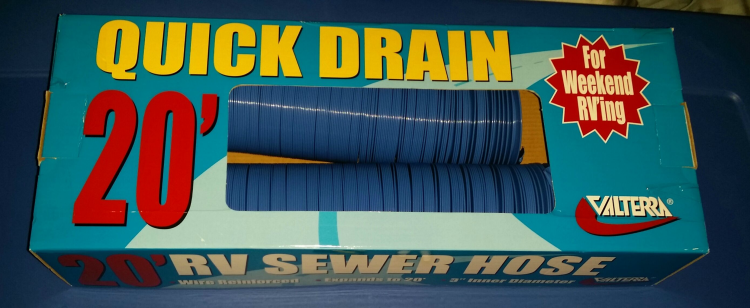
The blue hose was actually flexible RV sewer drain hoses.
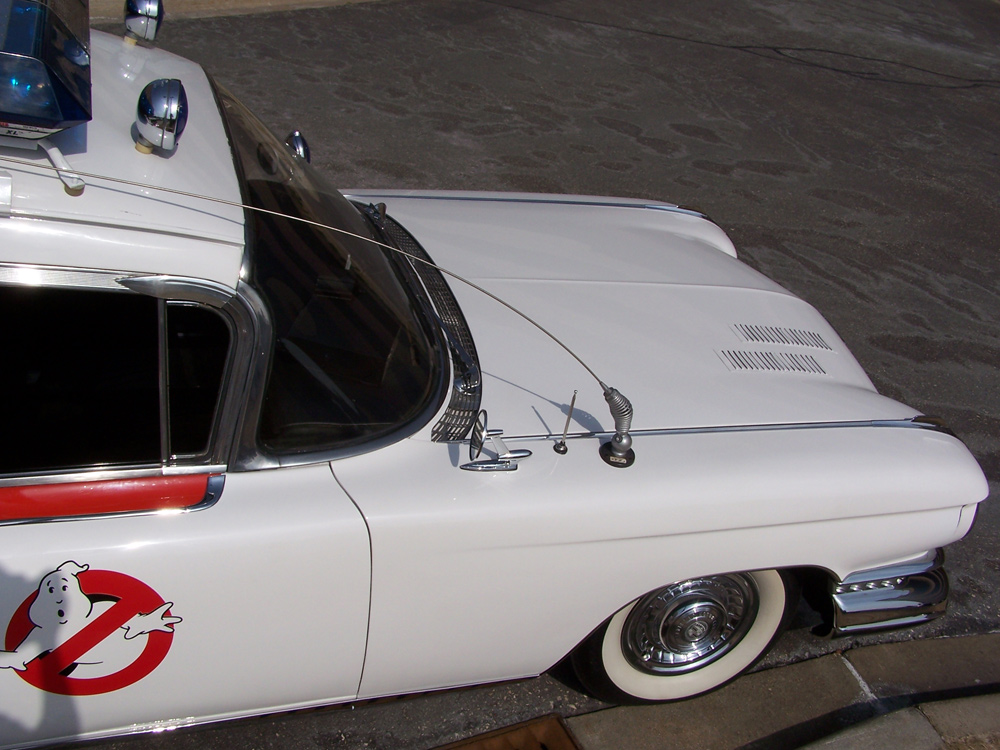
– – Ball Mount 102-Inch Whip Antennas:
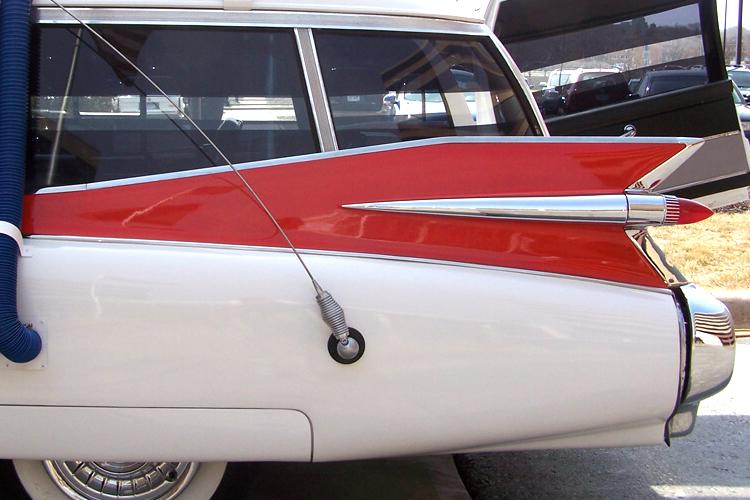
ECTO-1 had (2) 102-inch whip antenna’s on a Antenna Specialists ASP-633 spring loaded ball mount. One was mounted to the drivers side rear fender.

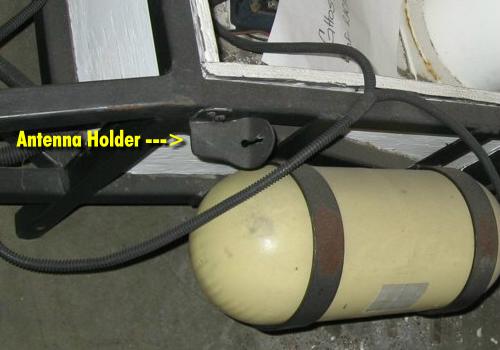
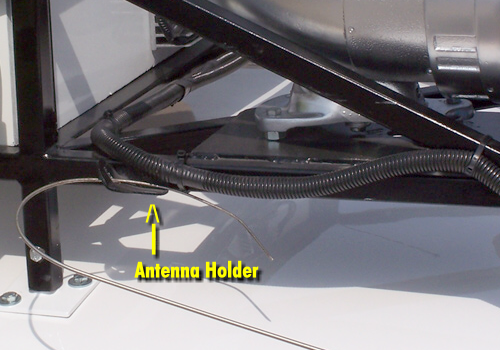
The top of the antenna was held by an antenna holder (clip) on the roof rack.
Here’s a better picture. Notice how the holder is a piece of curved middle with a slut and round hole? The ball on the tip of the antenna went through the round spot at the bottom, and slid up in to the slot where it was held in place. Typically vehicles using long antennas like this leave the antenna out and straight up. It’s usually only clipped in the holder when the vehicle is going in garages, or other low structures.
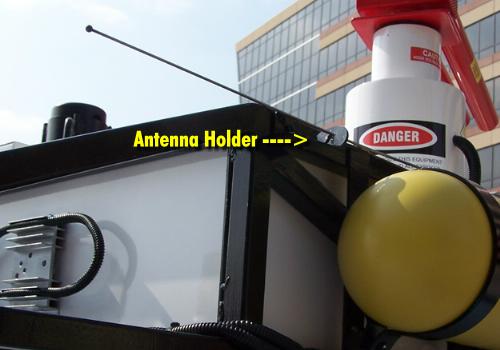
The other antenna was on the passenger side front fender.

This antenna also had an antenna holder (clip). It was on the passenger side of the roof rack near the siren.
You can see that the ball is missing on the tip of the antenna, so someone has bent the end of it and ran it through the antenna clip backwards.

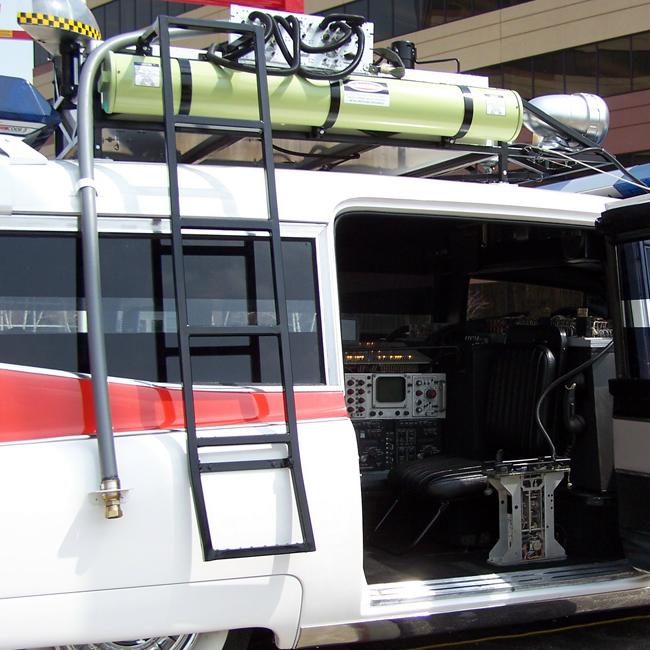
LET’S LOOK INSIDE THE REAR OF ECTO-1:

Even though the inside of ECTO-1 wouldn’t be seen in the movies, it also received a lot of ‘gadgets’ to make it look cool.
Let’s take a look…..
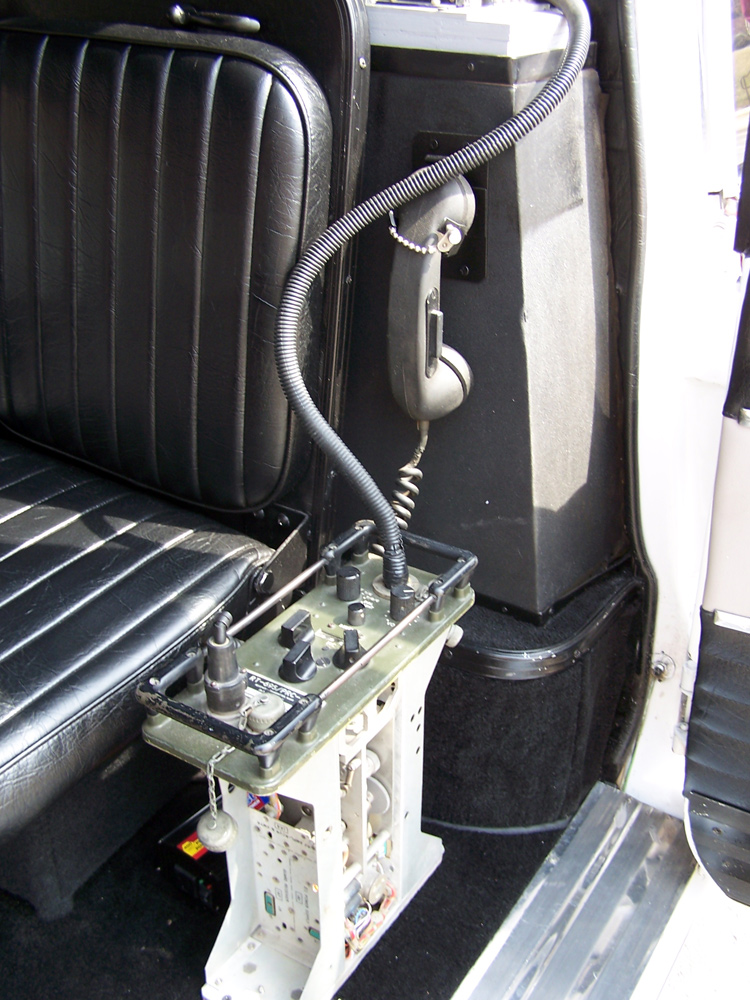
– – PRC-41 Radio With Handset:
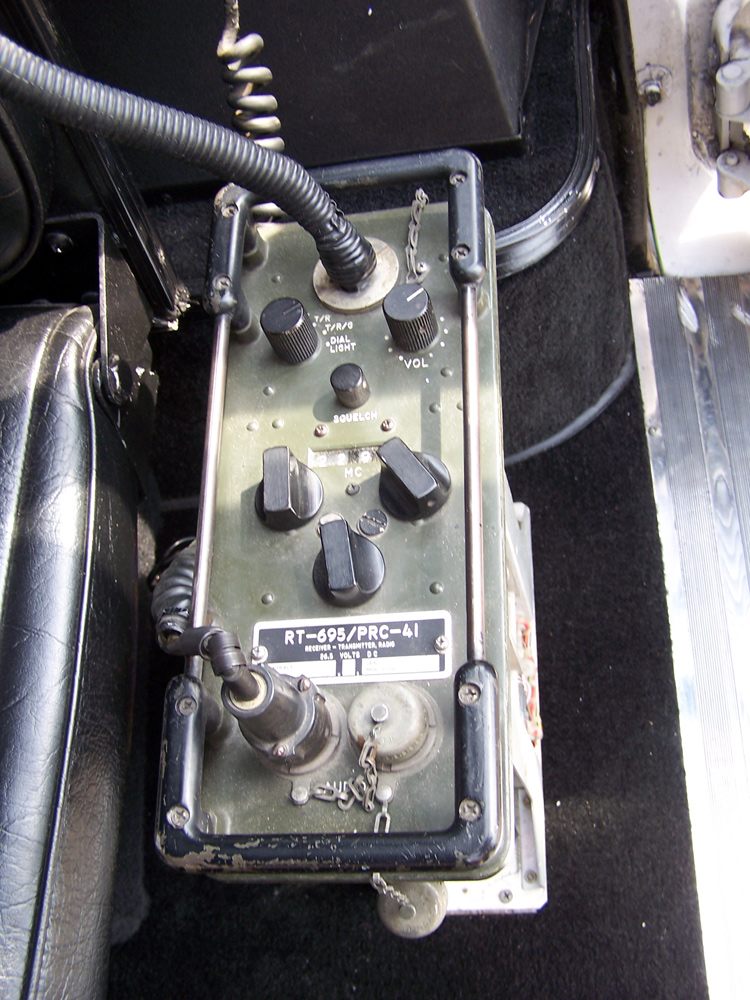
As soon as you open the rear passenger door, you’re greeted by a PRC-41 radio and handset from the 1960’s. The radio has been removed from it’s case to expose the electronics.
The PRC-41 was originally a portable transceiver for ground-to-air service, built with modified modules from the ARC-51. It is intended for forward air control.
The PRC-41 is wired directly to the half-dome directional dish mounted on the rear of the roof rack. It is used to monitor for possible EVP audio via the accompanying handset. The operator in the jump seat can listen in real time to the supernatural conversations being received by the dish. Fine tuning the receiver is done using the Telefunken SB329 control boxes at the passengers feet.
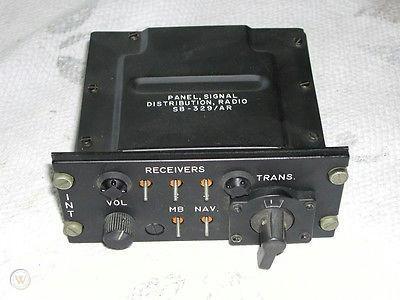
– – Telefunken SB329 Aviation Radios:
![]()
Just inside of the rear passenger door and to the left is a stack of (6) Telefunken SB329 aviation radios. These were mostly used in helicopters in the 1950’s and 1960’s. These have been modified to fine tune supernatural conversations (signals) being picked up by the half-dome directional dish mounted to the rear of the roof rack.
– – Tektronix RM561A Oscilloscope & Model BGM-34C RPV Panels:

Looking past the jumpseat inside the rear passenger door is a Tektronix RM561A Oscilloscope mounted above a BGM-34C missile guidance system.
The Tektronix RM561 Oscilloscope uses a transducer to convert energy sources in to an electrical signal displayed on the monitor as a visible waveform. In the field, it is often used to double-check currents from the proton pack cyclotron and to confirm that ghost trap power sources are operating at a consistent rate.
On the bottom is a BGM-34C missile guidance control panel that ordinarily would be used by the military to control missiles and remote piloted vehicles (RPV). Instead, it houses components from a standard Honeywell computer mainframe.
– – JT22 Analog / Digital Simulation Switch Control Panel:

Above the Tektronix RM561 is a JT22 Analog / Digital Simulation Switch Control Panel. The switches act as the master On/Off controls for the PKE Detection Array, coolant tanks, compressed air tanks, and all of ECTO-1’s lighting. The ‘Turn on Dane’ is an inside joke involving Professor S. Dane, and actually just turns on the main power to the Unity S6 spotlight.
People actually recreate this panel from scratch.
– – AN/AQH-1 AN/UNH-6 Sound Reproducer Set:
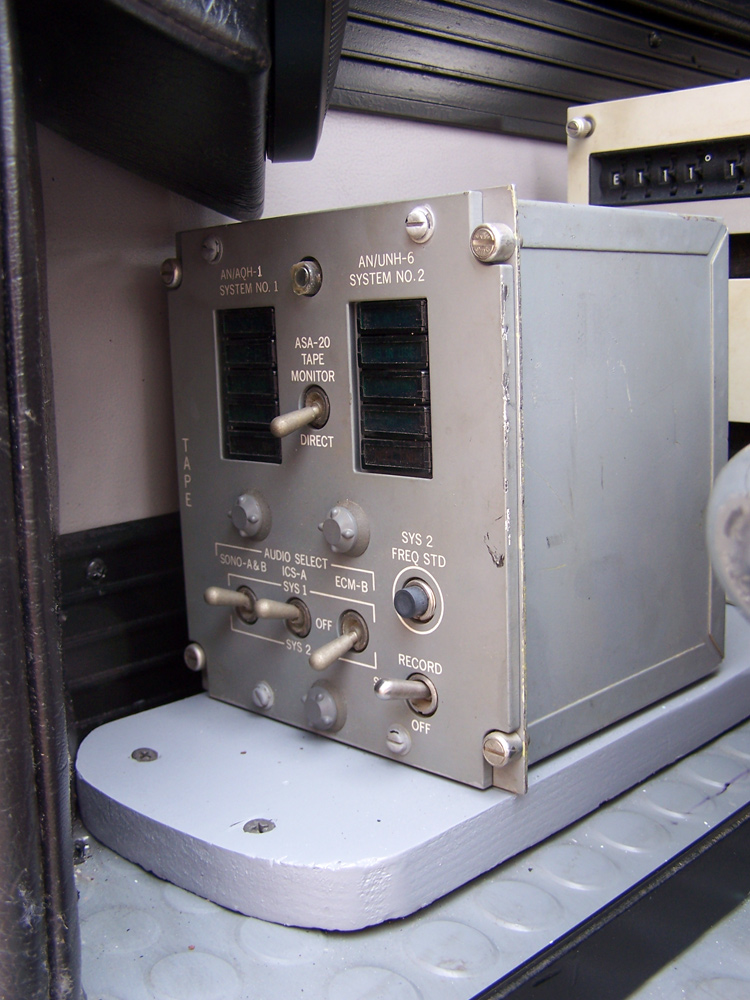
Looking in the rear loading door and just to the left is the AN/AQH-1 AN/UNH-6 Sound Reproducer Set.
– – Martin Marietta UHF Signal And Power Distribution:

Just inside the rear loading door and to the right are (2) UHF signal and power distribution control boxes.
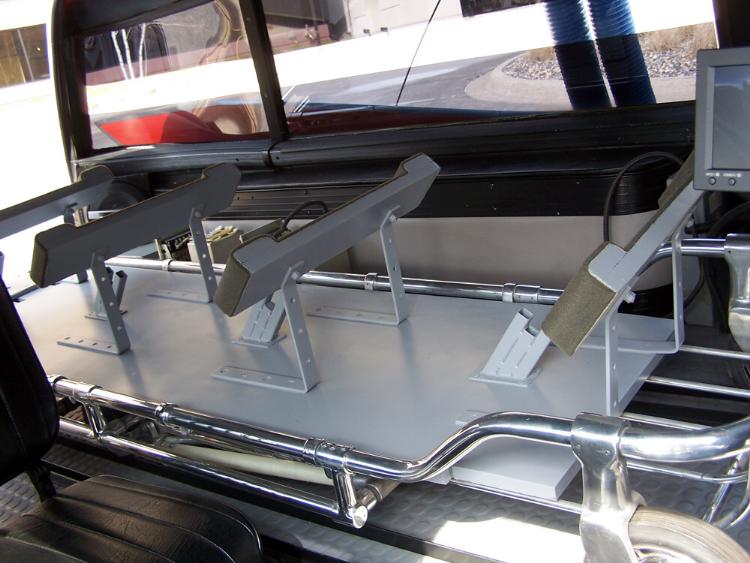
– – Ferno Washington Model 22 Gurney:
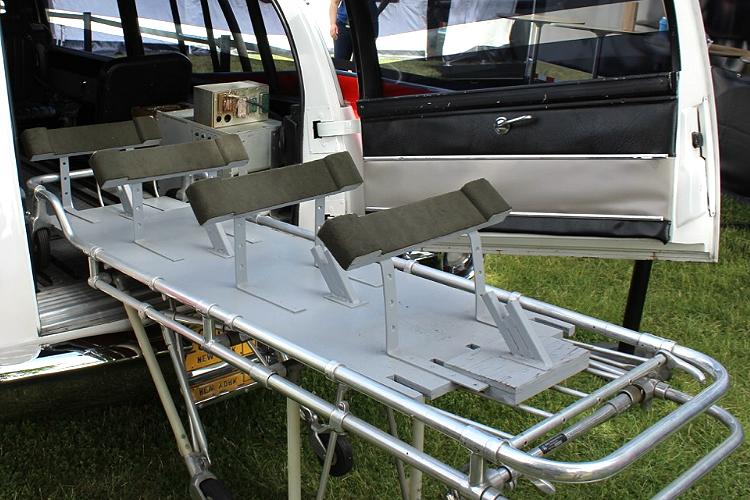
There is a Ferno Washington Model 22 gurney in the rear of ECTO-1 that has been modified to carry (4) proton packs for the Ghostbusters. You can see that the gurney was easily modified with plywood and large L-brackets to carry the proton packs.
LET’S SEE WHAT’S INSIDE THE FRONT OF ECTO-1:
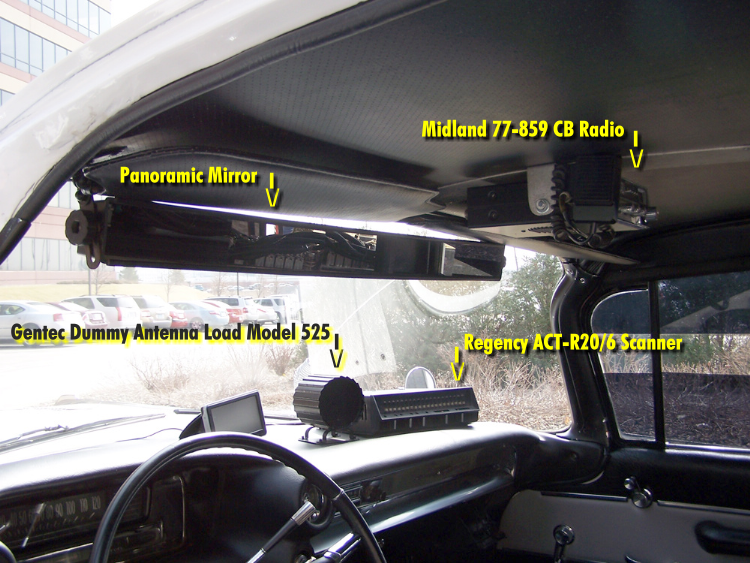
– – Regency ACT-R20/6 Scanner
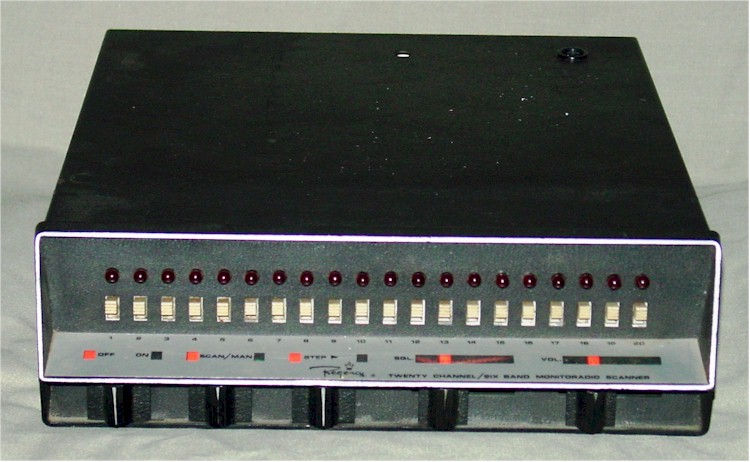 There is a Regency ACT-R20/6 scanner on the passenger side of the dashboard.
– – Gentec Dummy Antenna Load Model 525:
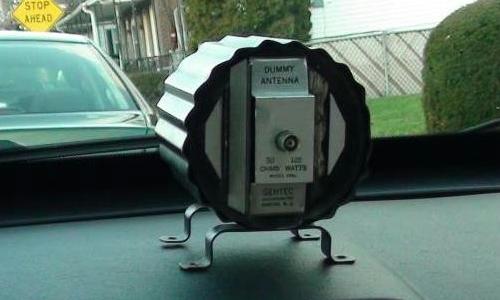
There is a Gentec dummy antenna load Model 525 mounted to the dash just to the left of the Regency ACT-R20/6 scanner.
– – Midland 77-859 CB Radio:
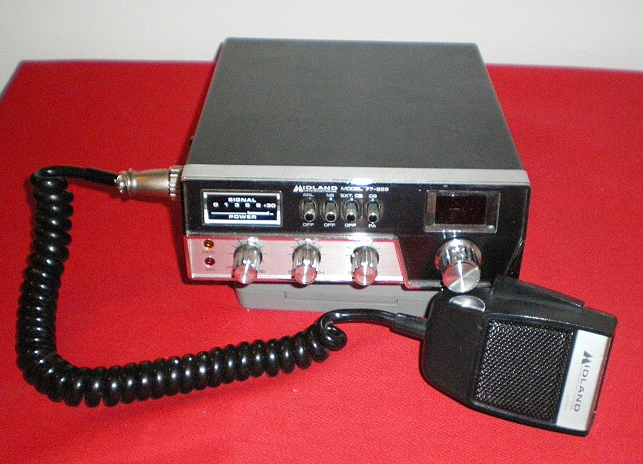
A Midland 77-859 CB radio is mounted to the ceiling between the driver and passenger seat.
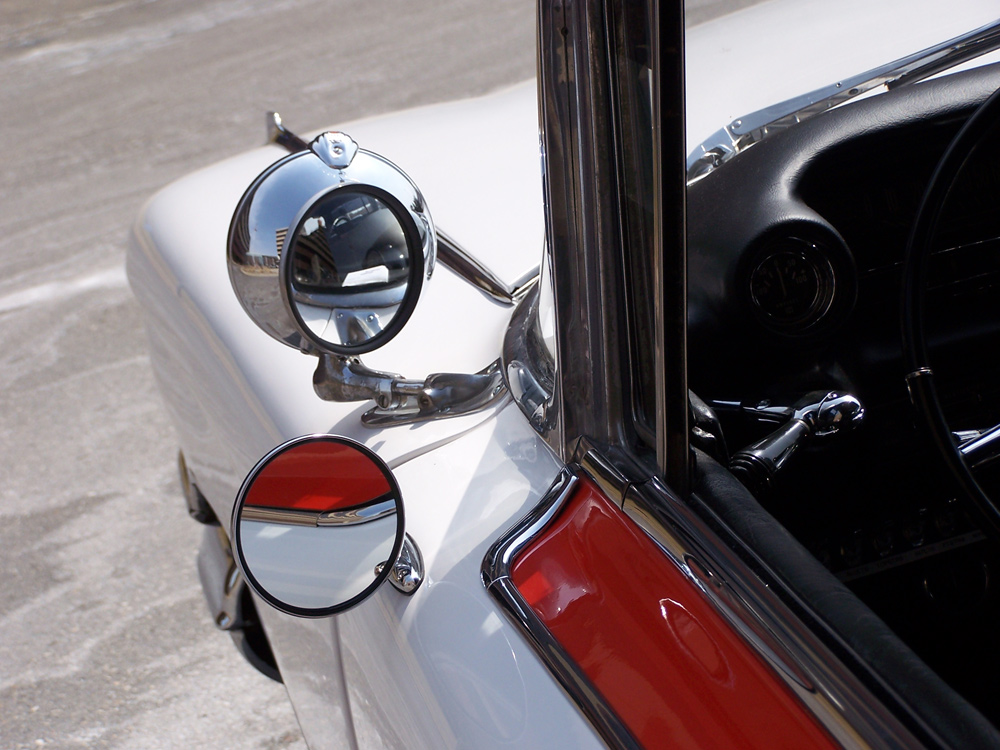
– – Panoramic Rear View Mirror:
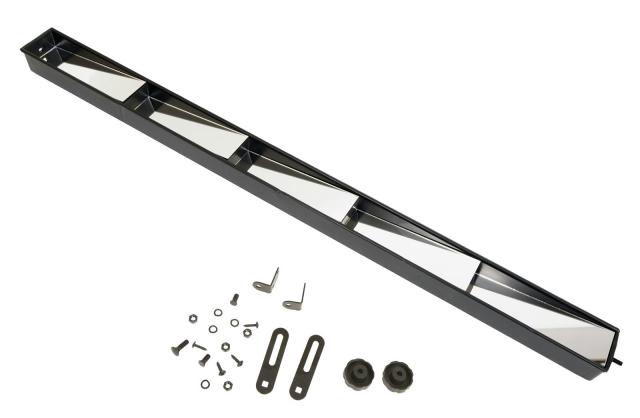
Instead of a typical review mirror, ECTO-1 uses a 5-panel panoramic mirror.
WOW, THAT’S A LOT OF STUFF!
This page is not meant to be a how to on how to build your own ECTO-1 Ghostbusters car. But it will hopefully give you some insight as to what’s involved. If you need more information or help on building your own ECTO-1, you should check out gbfans.com, and join their forum.
GET THE MANUAL:
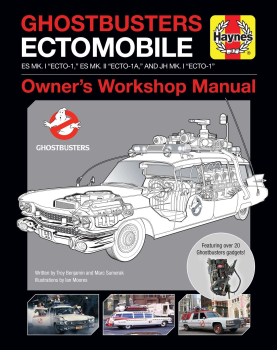
If you’re really serious about the Ectomobile or the ghost fighting equipment used in the movies, then you should get the Haynes Ectomobile Owners Workshop Manual.
SEE THE PHOTO GALLERY:
Check out the ECTO-1 Photo Gallery for even more photos of ECTO-1.